Category Archives: DIY Speaker Design

Building reference monitors for less than $500 (or euros)

Parts-kit

(Last updated on 2015-11-30)

Fred (France) is a young audio freelancer, and he’s been a loyal follower of my company for years. He recently asked me about a viable monitoring solution for mastering for about 500 euros or USD. My first impression was that it seemed impossible.

Audio Mastering is the most demanding audio application I know, and to me, a 500 bucks budget for monitoring simply seems not enough. From experience, I know that there is nothing you can buy off the shelf that will remotely have the required quality for mastering. It seemed obvious to me that if there is a viable solution, it shall be the Do-it-yourself (DIY) way. My deal with Fred is the following, I was going to make the design custom for his needs, but I would make the design public via this blog, so everyone can benefit from it.

Since the midrange is the most important part of the spectrum, I’m convinced that 3-way monitors are the way to go, as you have a driver dedicated to the midrange. Using the 3 way configuration, there is no crossover right at the middle of the spectrum.

Unfortunately, 3 way tend to be a much more expensive solution than a 2 way, not only because you have 3 drivers instead of two, but also because you have 2 crossover points instead of one, the enclosure physically needs to be bigger, and larger woofers are generally much more expensive than midwoofers.

In this case, being short on budget, it is obvious that we will need to make some compromise. The first one will be to go with a 2 way instead of a 3 way. Just by doing that, we are saving plenty on the enclosure, as well as on the crossover.

36612-fostex-pm-2-mkii-single-large

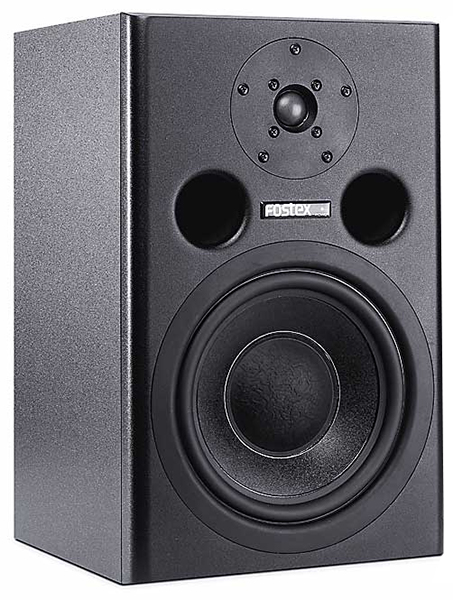
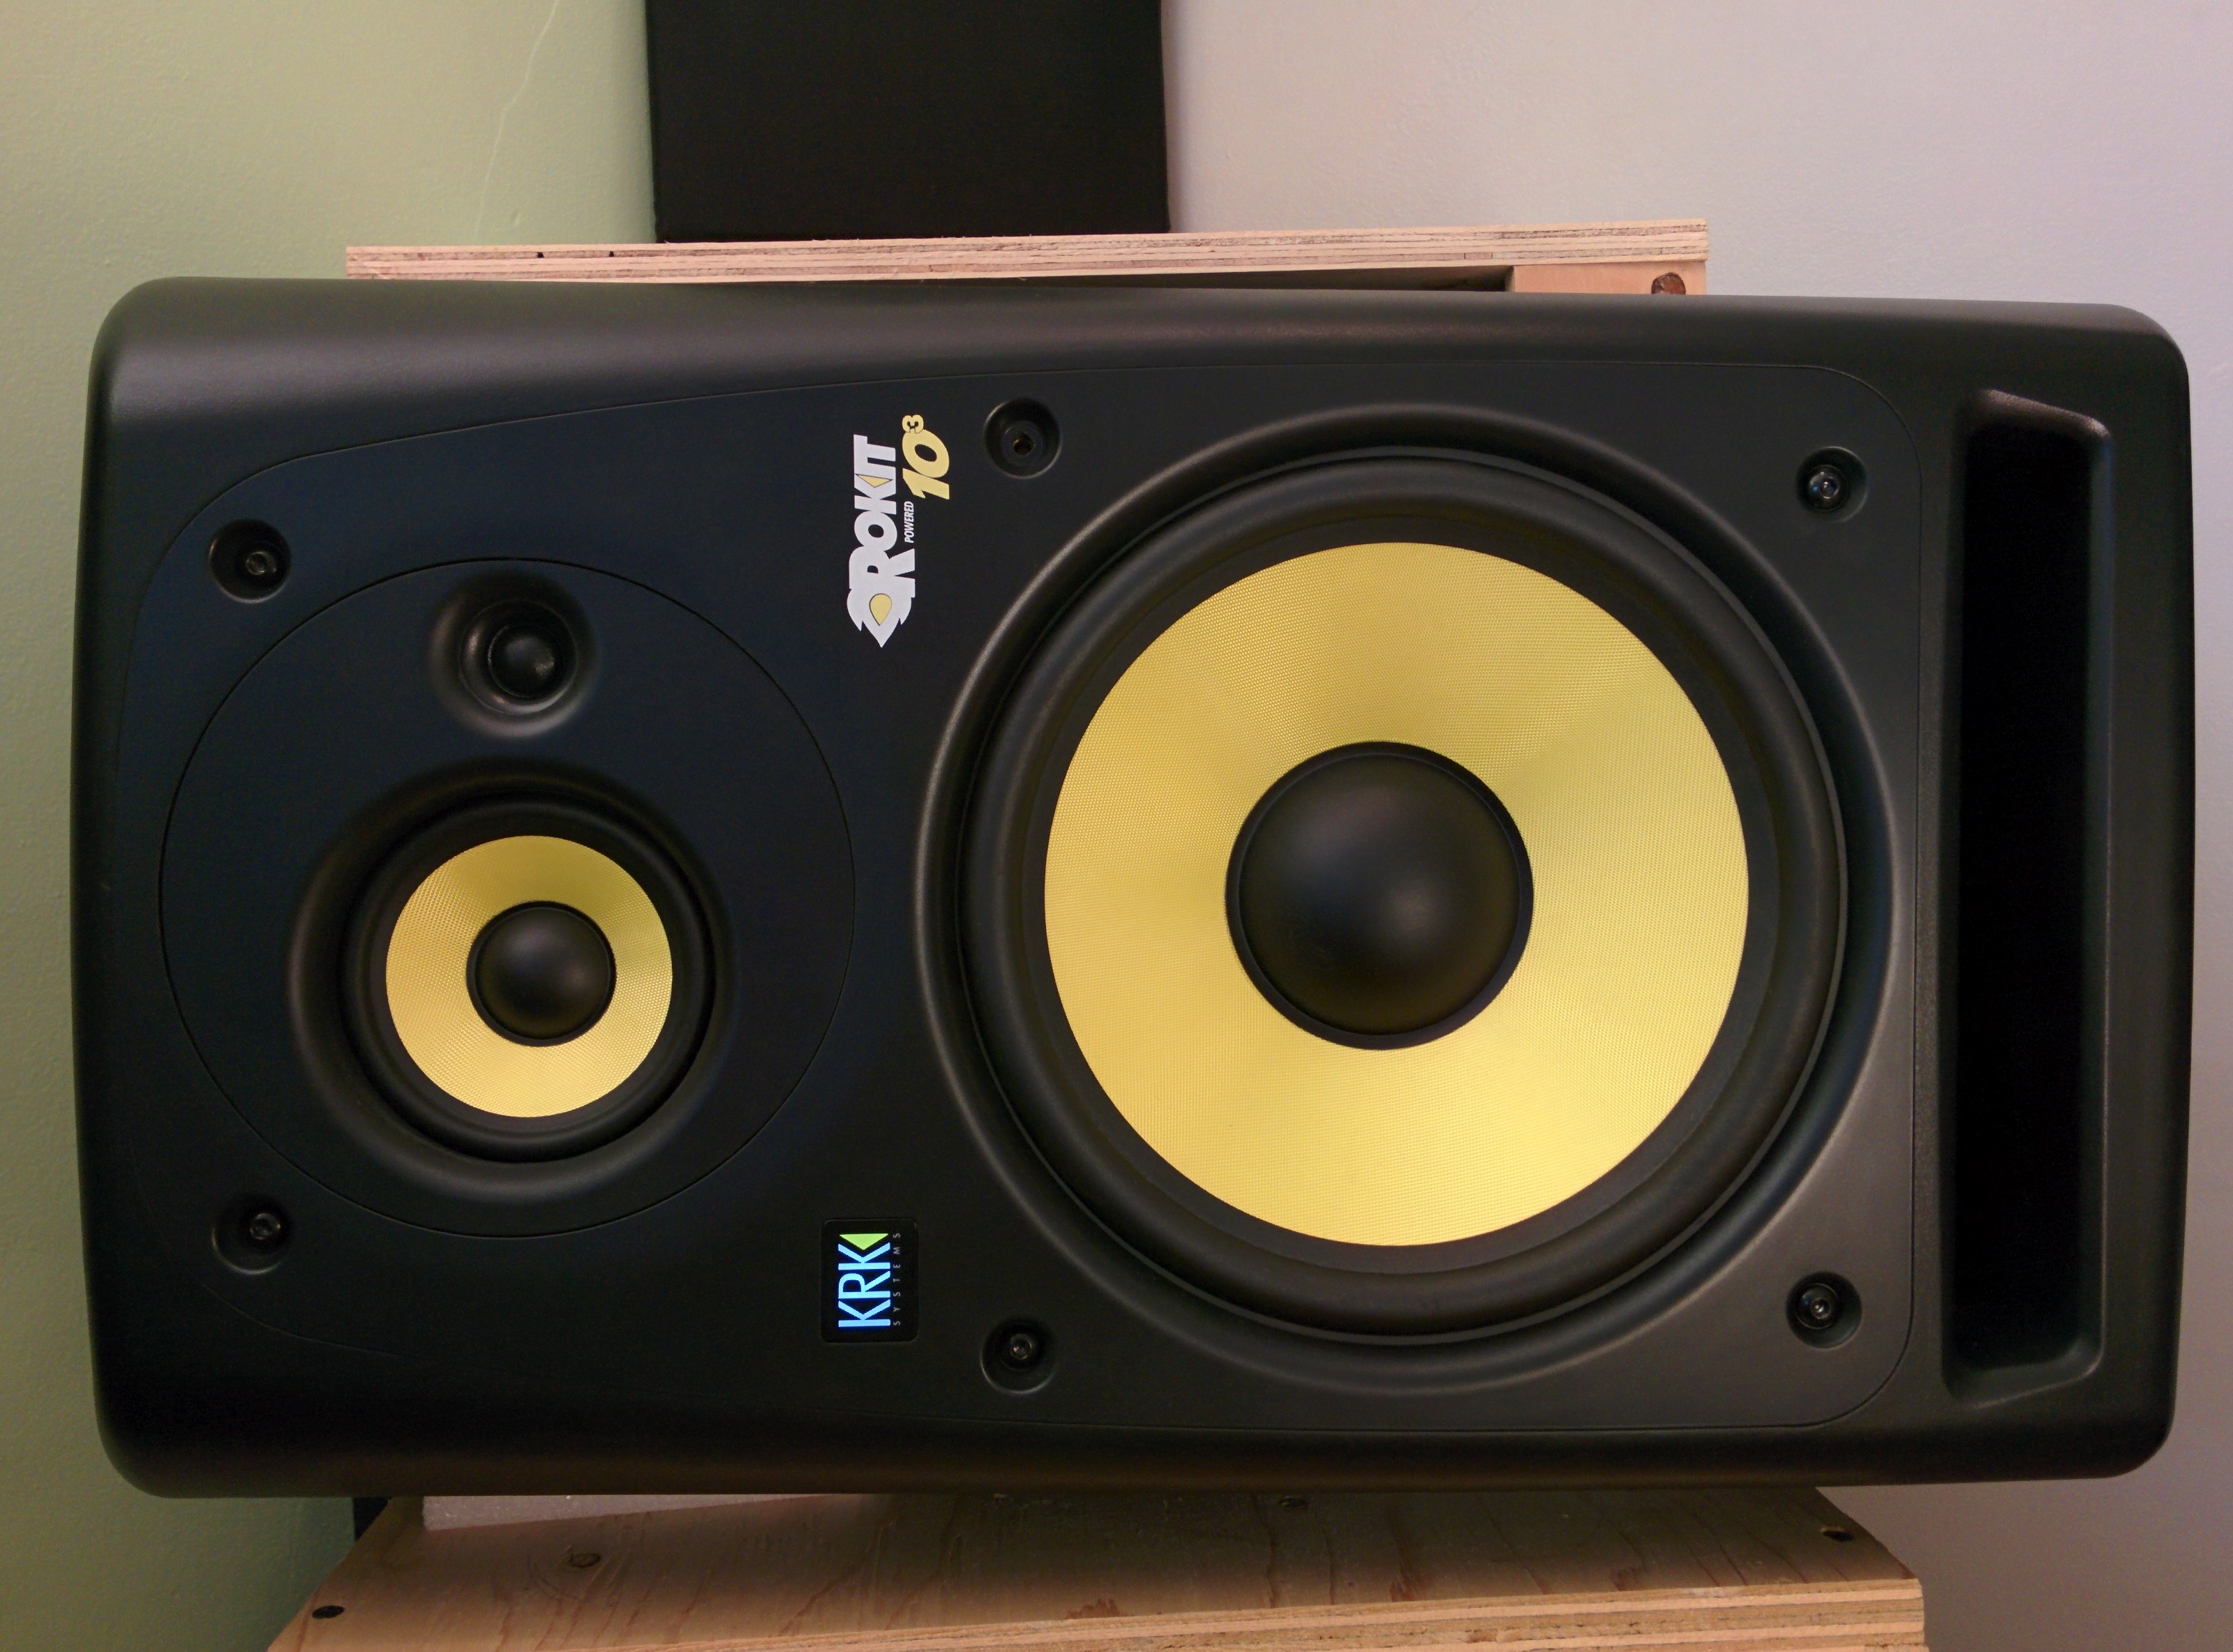
Fred currently uses a pair of Fostex PM2 MK2. This is an active design. I personally believe it would be better to have it passive, as you are sure to have the best possible speaker for the price, and then you can always upgrade the amp multiple times in the future. For the price they were sold at, don’t expect to get anything better than a 15$ woofer and a 9$ tweeter in it. Such design usually are cheap on every components in order to make it competitive on the market.

His original speakers (the Fostex) have a 8″ woofer, paired with probably a super cheap tweeter in 2 way configuration. It is obvious that the mid range of that speaker must be average to bad.

Why do I say that ? Well, only high end and very expensive tweeter can go as down as 1 kHz (we are talking about 300$ per tweeter, ScanSpeak Revelator grade) and a 8″ woofer will be too heavy and slow to cover up  in the midrange. For both drivers, distortion will increase drastically when used outside of their optimal range.  I would say that a 6-1/2″ to 7″ woofer is about the biggest you can realistically pair with a good tweeter to cover accurately the midrange. The quality of the tweeter can make or break a 2 way design. In our case, we will need a tweeter than can go as low as possible without too much distortion artifact… and most importantly without breaking the bank.

Some design considerations:

I know for a fact that Fred is working in a relatively small room, as do most audio freelancer who work from home. That means the woofer cannot be too big, as a small room doesn’t handle well large volume of moving air. The tradeoff is that we must accept that the low end extension is going to be limited. The good news is that by doing so, we can aim for a woofer that performs well in the midrange, without getting too pricey.

Working in a small room also means that we are better to use nearfield monitors, otherwise the sound of the room will overpower the original signal. In that sense, a two way makes much more sense, as it requires much less distance between the listener and the speaker for the driver’s response to sum up. Some tower speakers, such the one I have require at least 2 meters to sum up.

Going two way, not emphasizing too much on the low end means you can have a very precise and defined midrange (Using woofers with a low Qts will make it very responsive and quick to respond, but limit its low end extension). As discussed before, the midrange is key in Mastering.

An interesting fact is that if at some point Fred decides to move to a bigger room, he’ll just have to complement his setup with a subwoofer and he will be good to go, assuming I have done my job properly.


The suggested design

In summary, our objective is to put together the best possible monitor for critical listening, within a $500 budget.

I already gave away few hints about how I intended to achieve this:

  • 2 Way configuration
  • using 6-1/2″ or 7″ woofer with low Qts (for very quick transient response)
  • and a good value tweeter than can go low, with low distortion.
  • in a Passive design

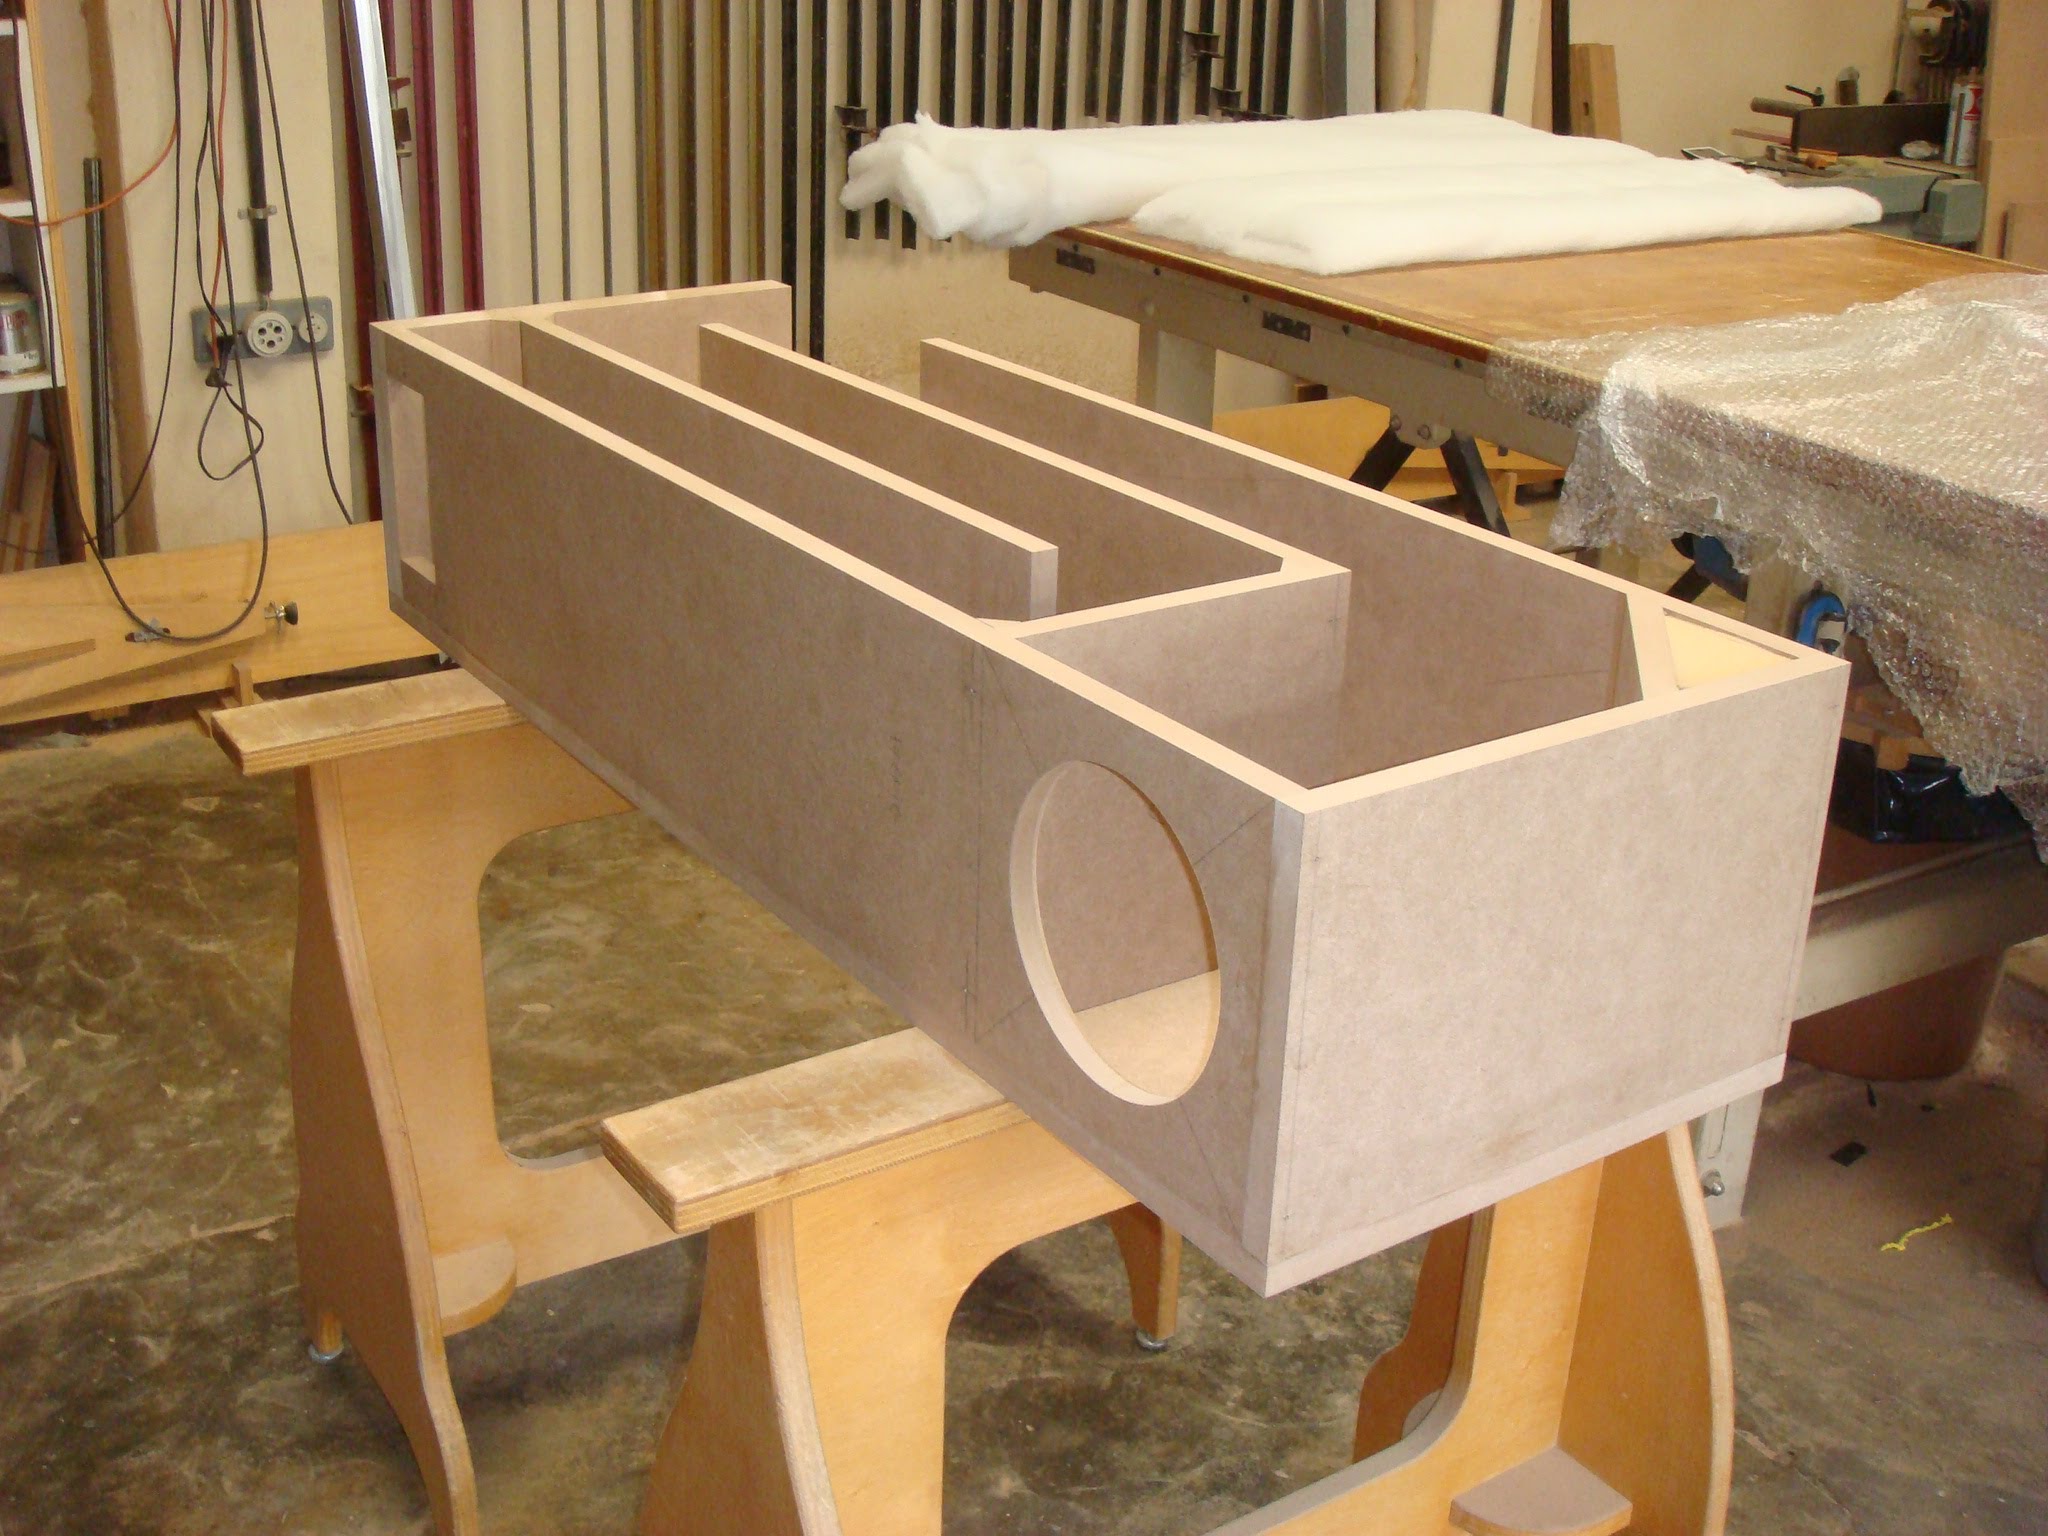
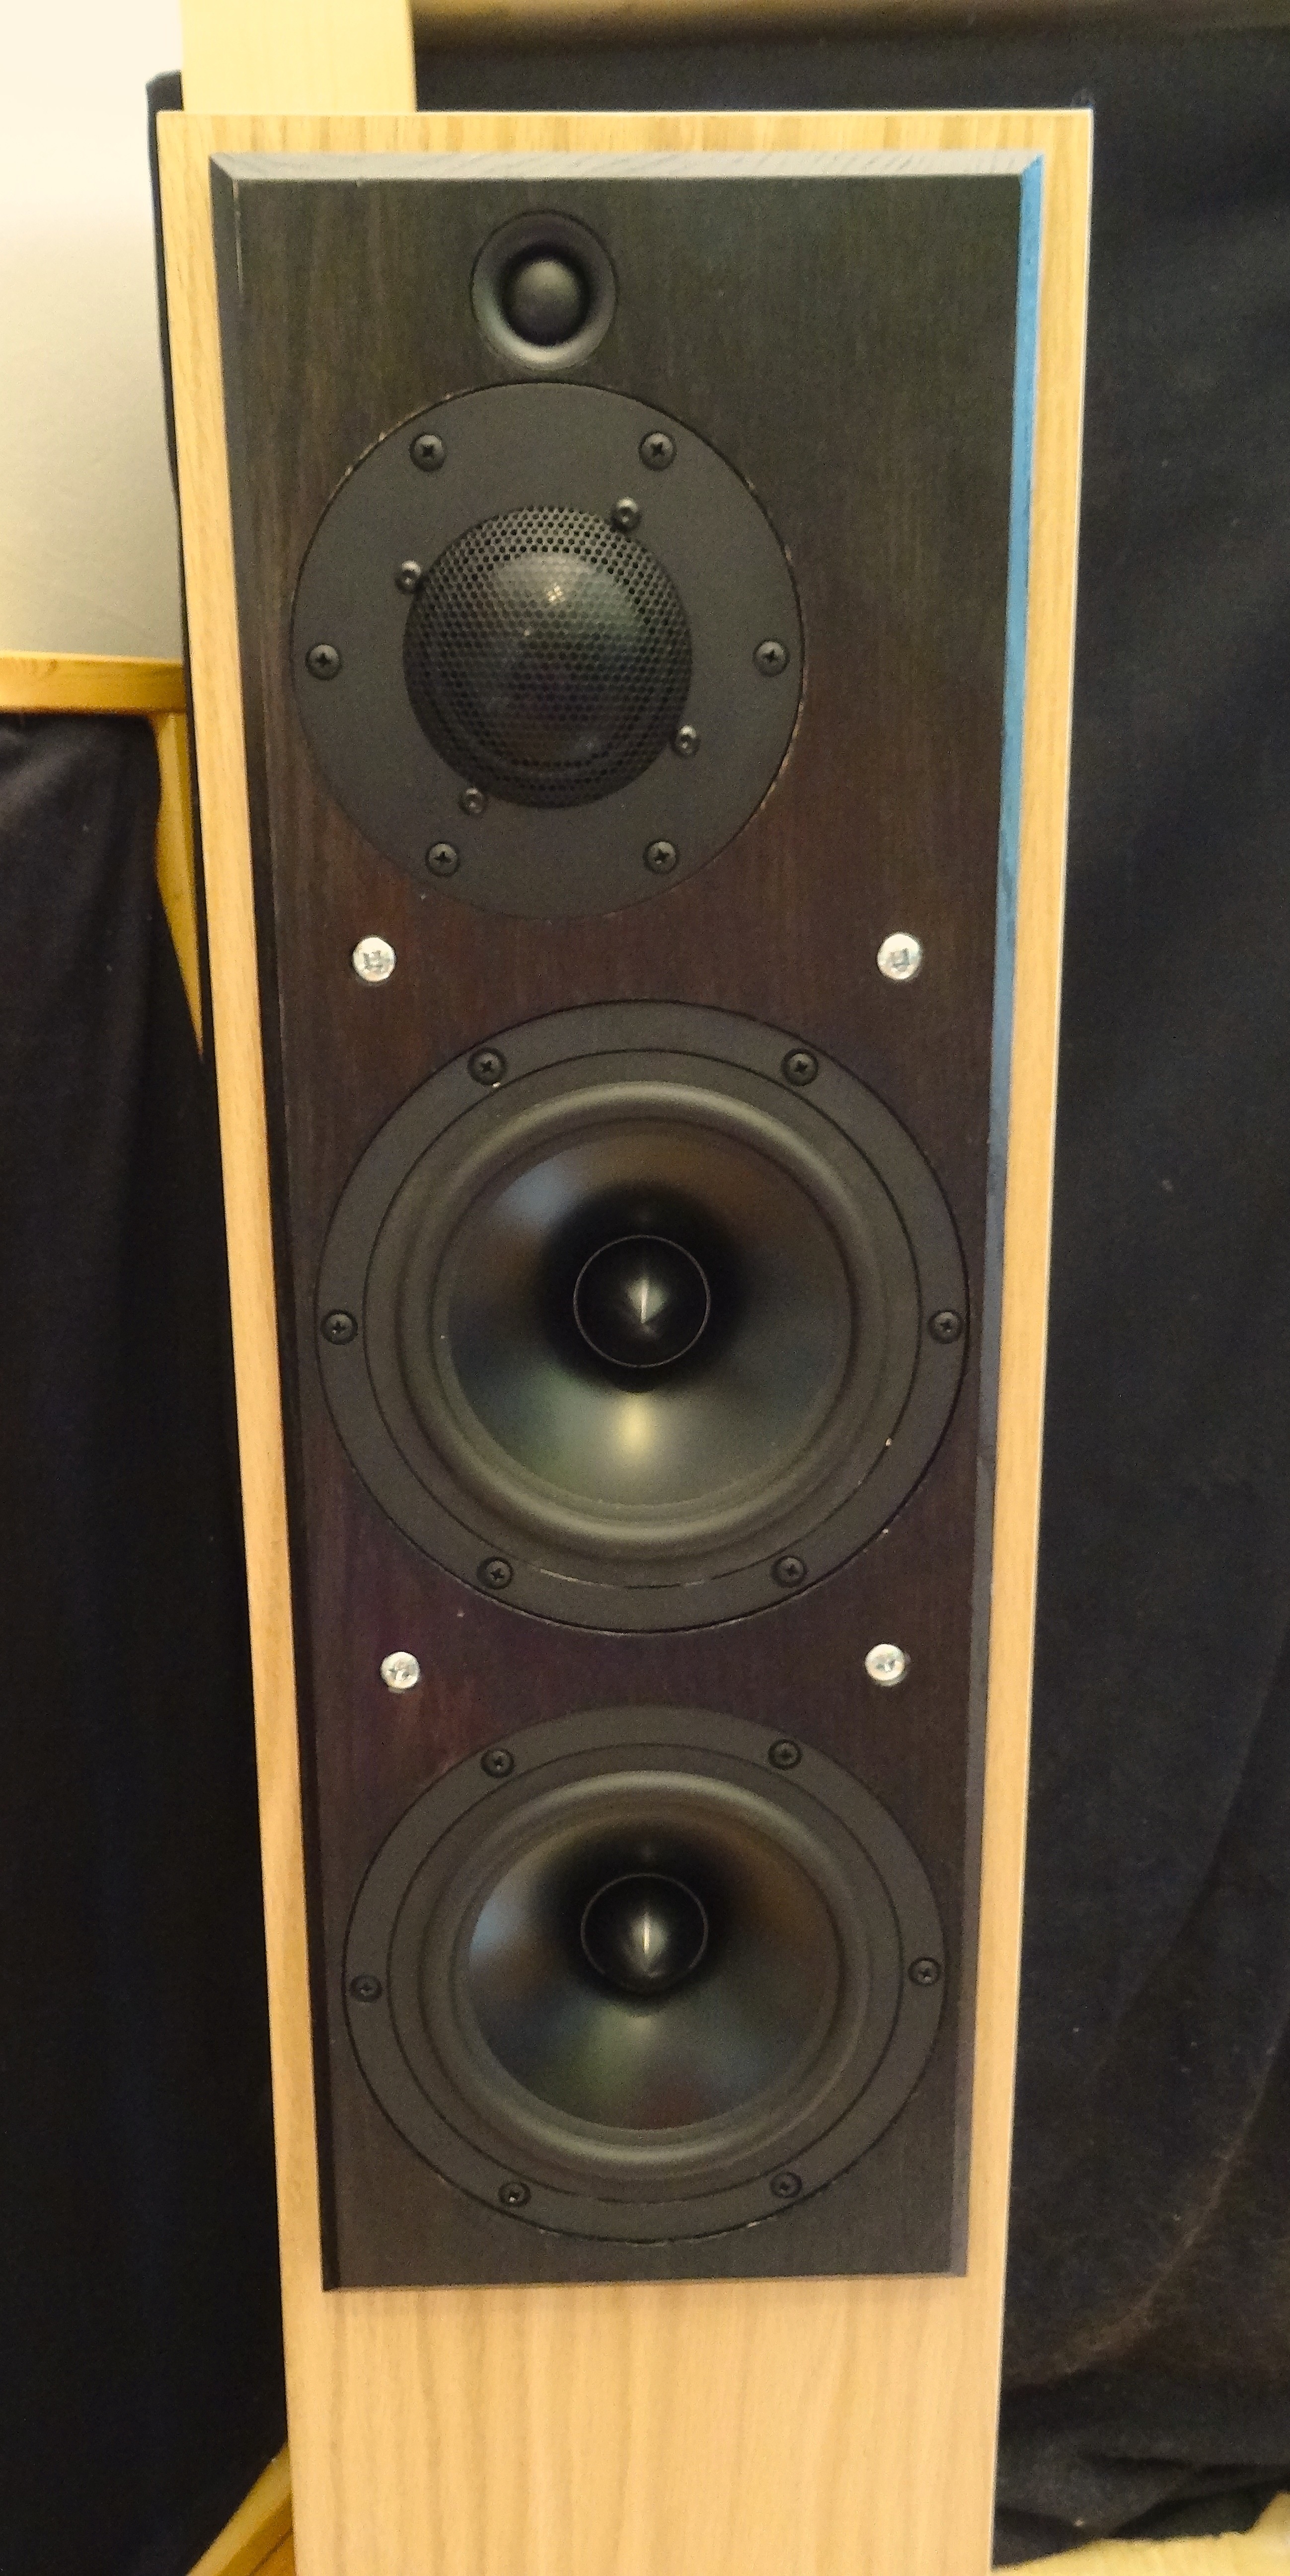
Knowing this, I like to start with finding an appropriate enclosure, for the simple reason that it can be a very limiting factor; the cabinet alone can be very expensive and its contribution to the overall sound quality is somewhat limited.

In this case, we are looking for an easy solution that everyone can replicate at home. By looking on Parts Express website, I decided to go with the following Dayton Audio enclosure, that goes for about $65/pair. It’s a 0.52 ft^3 enclosure that already has the holes in it and comes with a rear port and the connector plug. Drivers can be countersunk into it, which gives a nice finish, but also helps phase coherence.  Built quality is good and the product has a very good value. Shipping is free for Americans, unfortunately being Canadian, shipping is rather expensive in my case.

300-645_HR_0

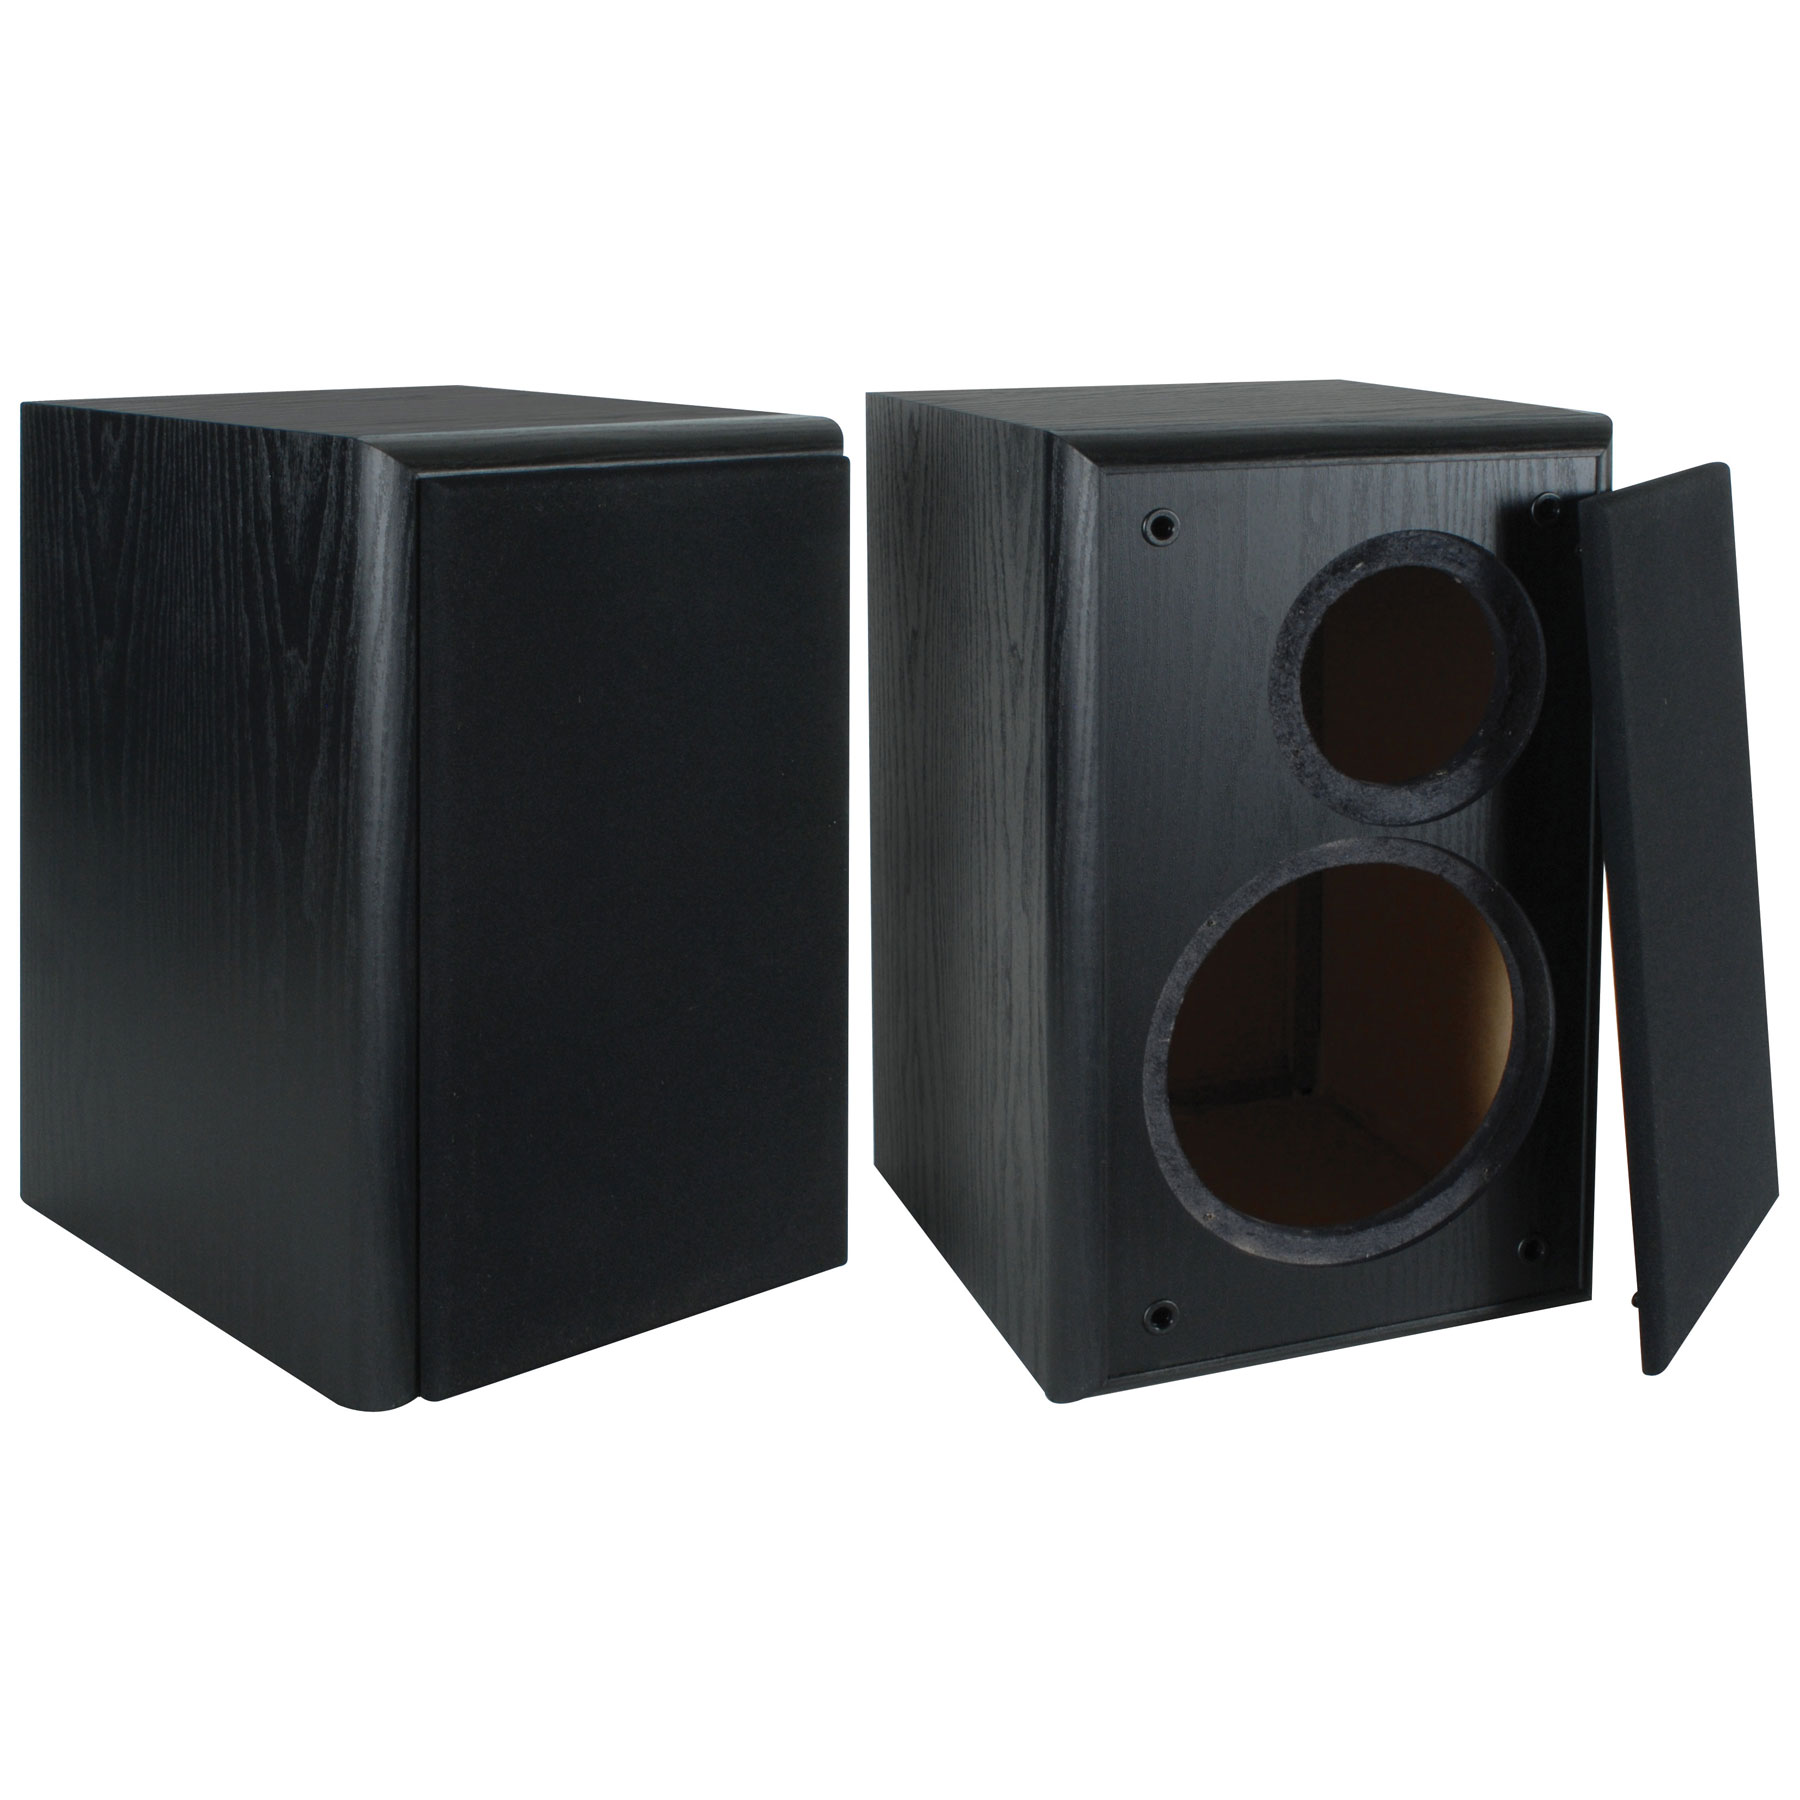
The enclosure dimension will now define what driver I’m going to put in. I know most people would prefer to do it the other way around, but since they aren’t many options in terms of already made enclosure that’s the way we are going to do it here.

The woofer hole is made to accomodate a 6-1/2″ woofer with a flange size of about 165 mm. The tweeter flange hole has 110 mm. Since most tweeter has a flange diameter around 104 mm, that should not be a problem (will not fit perfectly, but pretty close). Woofer flange size are less standard in general, but if I stick to 6-1/2″ woofer I should be able to find something decent that fits.
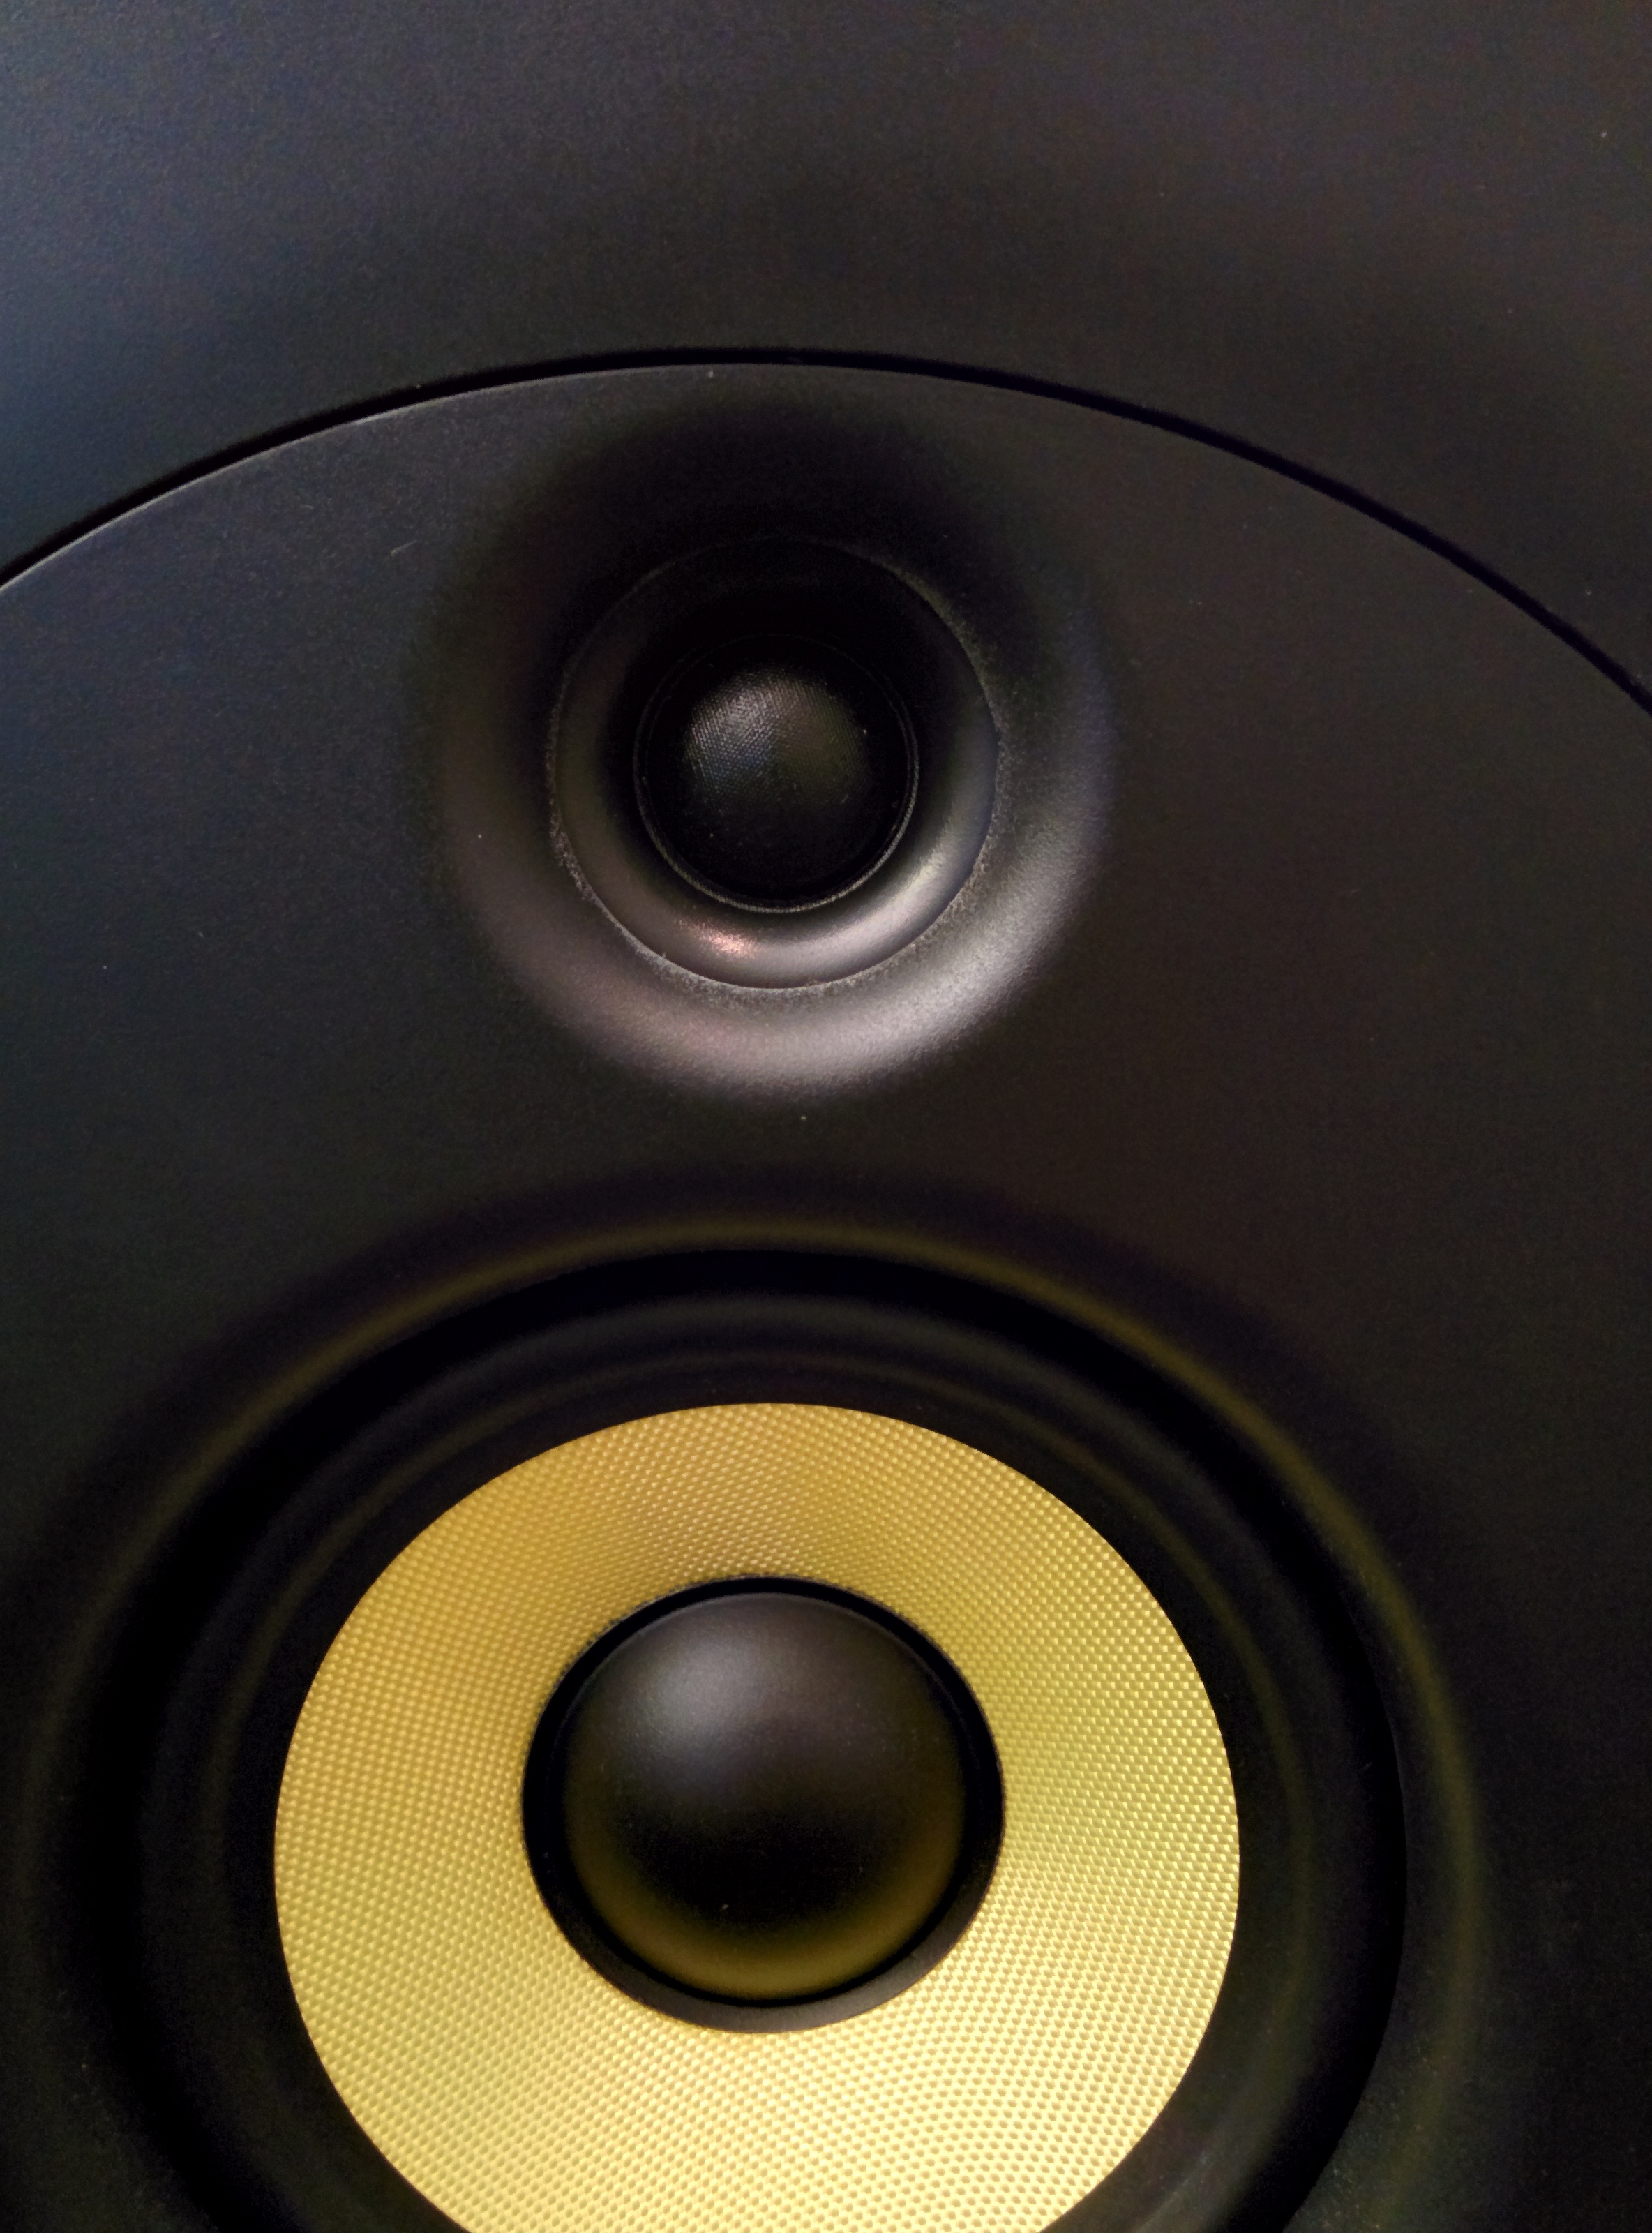
 

The Tweeter:

As I said before, the tweeter will make or break this design. In a two way design, roughly half of the spectrum will be covered by the tweeter. Also, the tweeter is where lies all the detail and definition. While a cheap tweeter will make high frequency sound harsh (shrillness), an expensive one will sound delicate, defined and beautiful.

Scan Speak are currently making the best tweeters on the market but also the most expensive ones. Seas comes not very far behind, with some models in the $500+, but make also some very decent affordable ones. The Norwegian company has the reputation of making very good quality tweeter, with unbeatable fabrication consistency and tight tolerances.

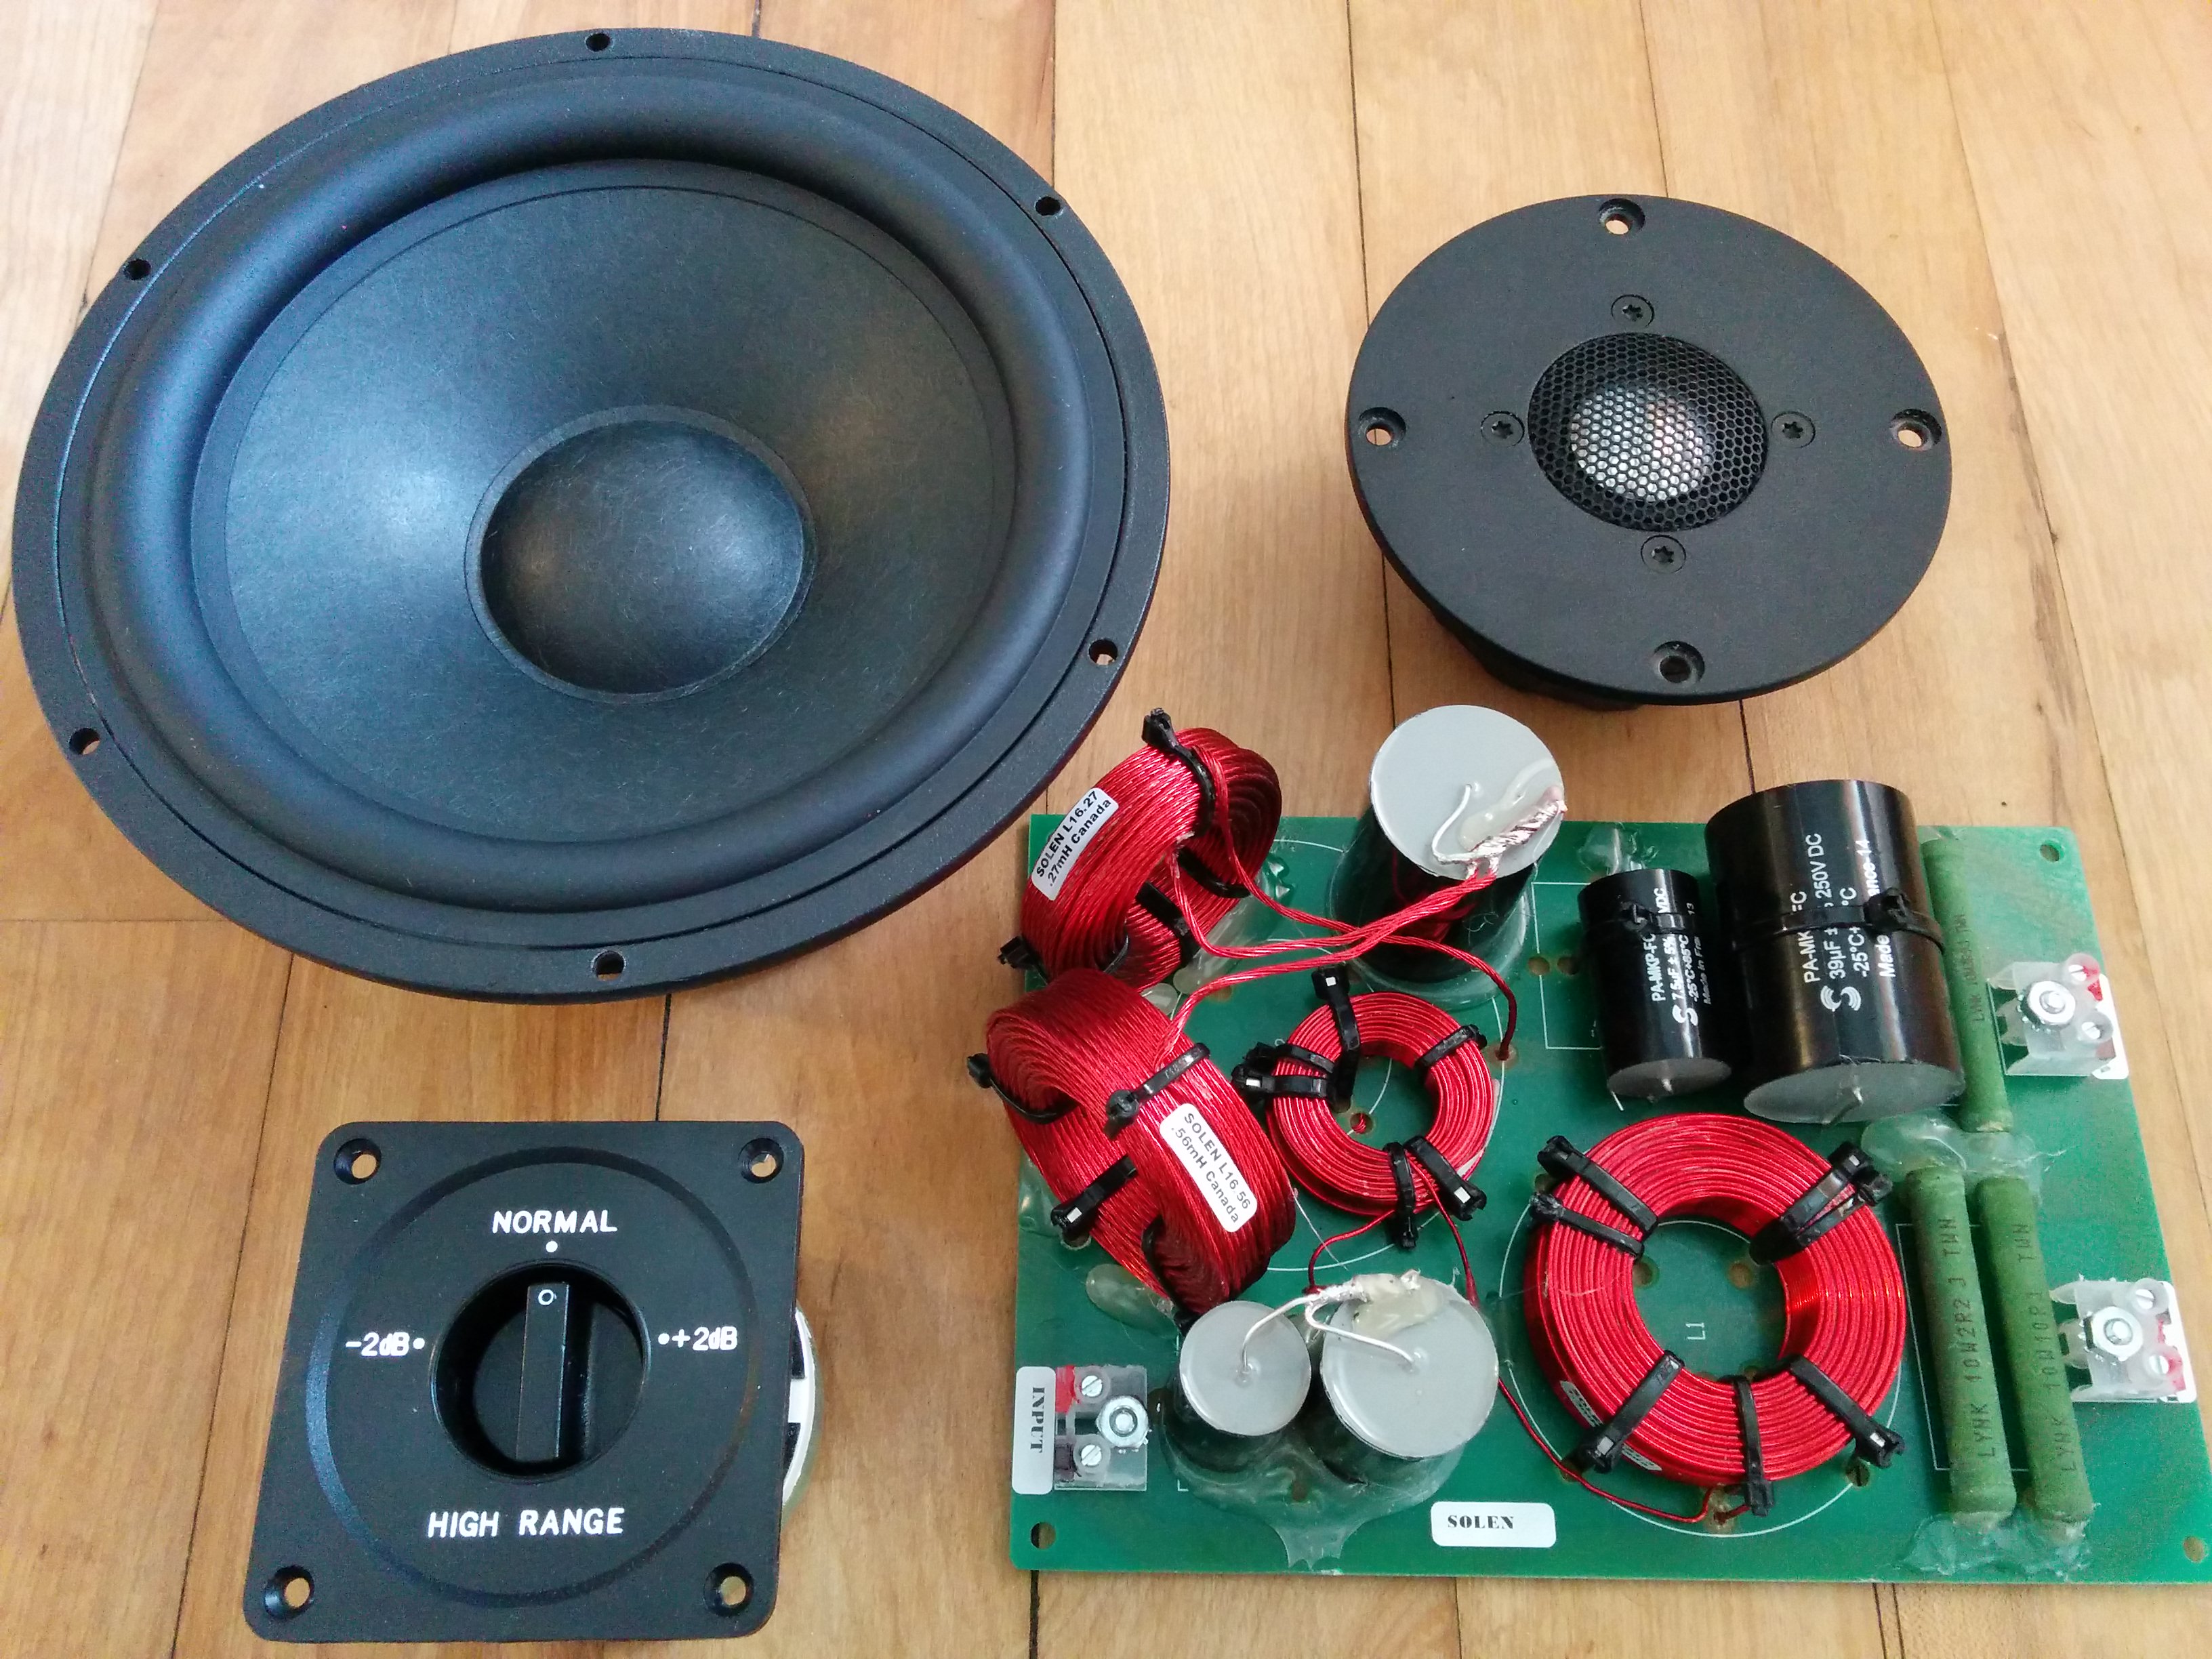
SEAS Prestige 27TAFC/G06

27tafcg

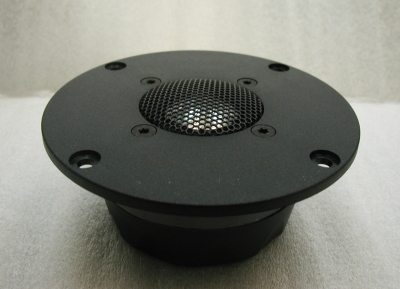
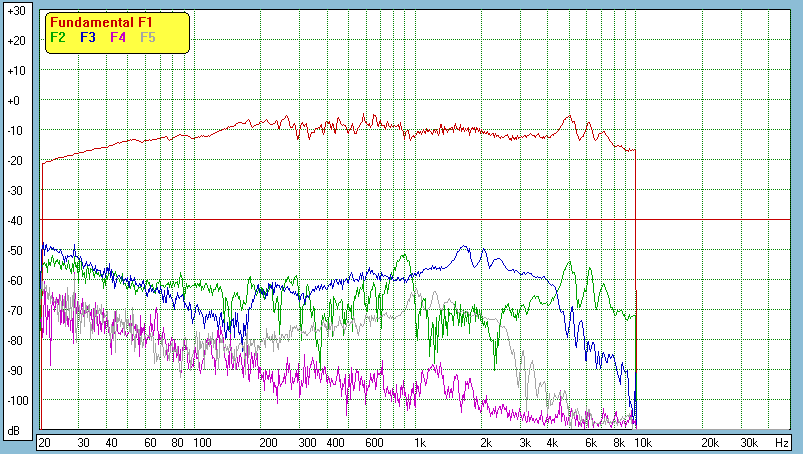
This a tweeter that you usually find in the $65, but is currently on  at 50% sale at Solen. This tweeter has a great value for the price with a very smooth response, very low distortion of all types above 2 kHz. The high order harmonics is almost non-existant. Most interestingly, the transient response is incredibly fast on all the audible range. Transient response is a very important factor in mastering.

Tweeter fr

tweeter CSD

Seas_27TBFCG-HD


The Woofer:

The tweeter now selected, we need a woofer that will be able to take care of the other half of the spectrum. It needs to have a solid midrange good enough to take care of anything from the bottom of the tweeter range to all the way down. The woofer in a 2 way has to be very good, since it has to take care of the midrange, the low mid and the low end, all at the same time.

Again, a Scan Speak from the revelator series would have done a great job here, but it would have cost more than $300/each. Fortunately, Asian drivers have improved tremendously in the last few years. Their performance is now not too far off from high end drivers, but their price is much lower.


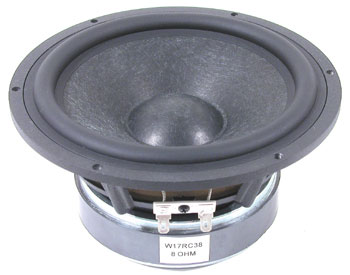
Silver Flute W17RC38

I’ve decided to go with the Silver Flute. It has a well built cast frame with a wool fiber cone and a reasonably smooth response with a minor breakup at 5Khz. It has an average harmonic distortion performance above 1 kHz, but it is generally clean on its useful range. Bass is pretty clean, though not as extended as most 6-1/2″ woofers. It has a pretty tight transient response for a woofer of that size. This is due to its very low Qts, as discussed earlier. It has a pretty high sensitivity even for a 4 ohm driver, which makes it a very efficient woofer. Overall a very usable and well built driver of good value.

w17rc38-4


W17RC38-04-FR

W17RC38-04-CSD


W17RC38-04-HD


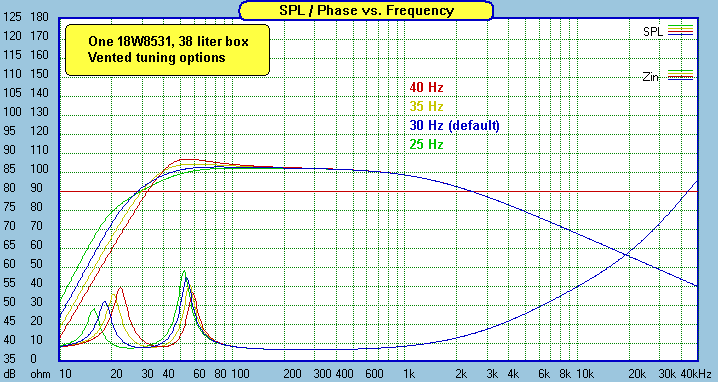
Bass Extension design

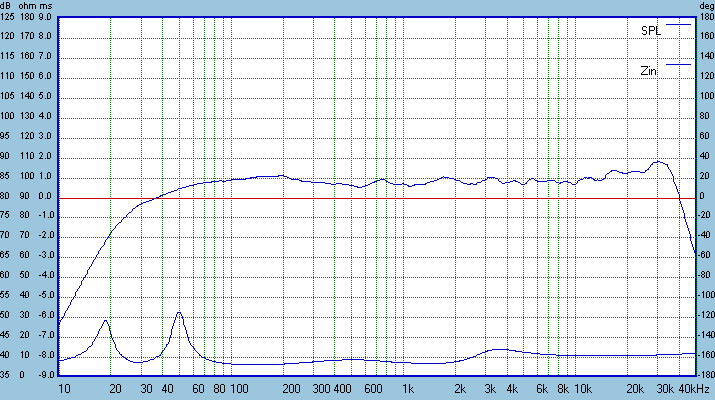
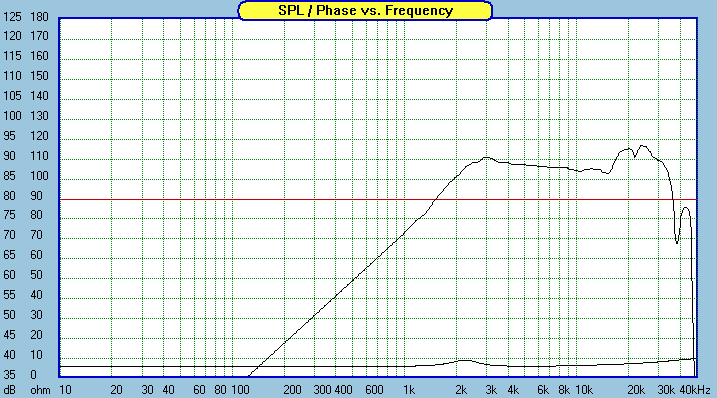
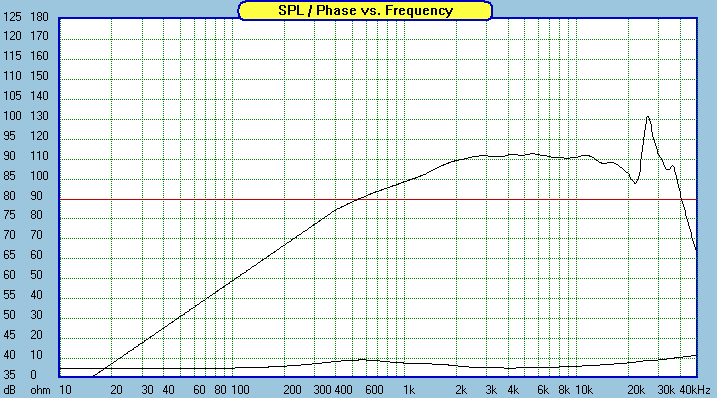
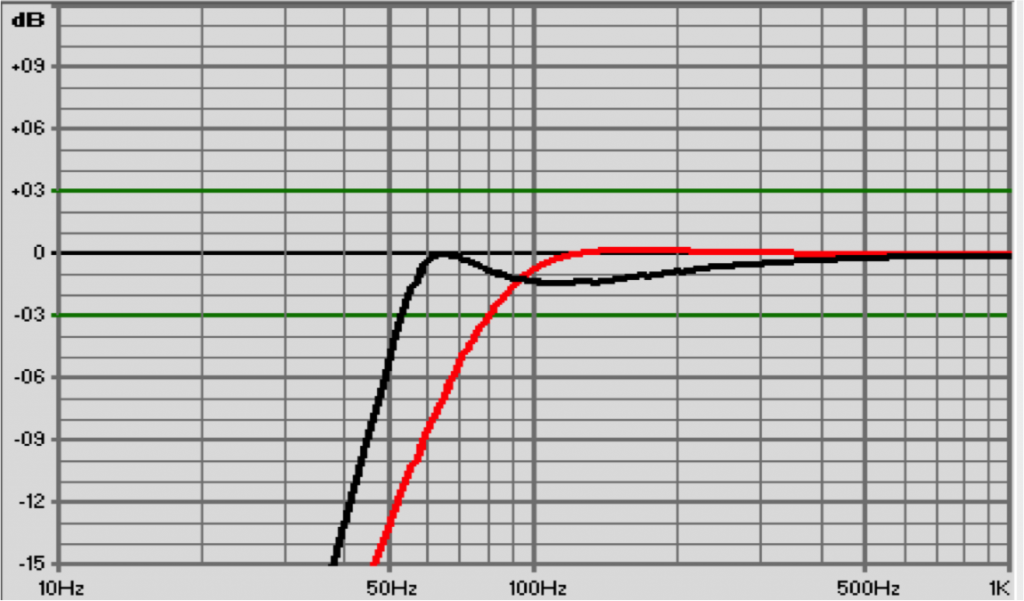
The size of the box being already decided for us, it becomes easy for us to tune the port and decide how we extend the bass. Sometimes to limit our options is the best way to get creative and move forward. This enclosure is sized for an EBS design (Extended Bass Shelf), so I decided to go with the flow with it. The idea is to have a box that is just a bit oversized for the driver and then to tune the port close to the resonant frequency of the driver. As you can see on the following graph, we are able to extend the bass by a lot. The drawback of this technique is that we are going to create a dip in the 100 Hz region. In this case, a 1.5 db dip is totally acceptable. This design gives us a – 3db around 51 Hz, which is not that bad at all, considering that I was ready to sacrifice the low end in the first place. As discussed before, Fred currently works in a small room. If he moves to a bigger room, he will just have to acquire a subwoofer to take care of the 25 to 50 Hz range.

The Silver Flute model we chose is pretty clean in the low end for a driver of that size, which means it shall be able to handle the 51 Hz in a elegant way.
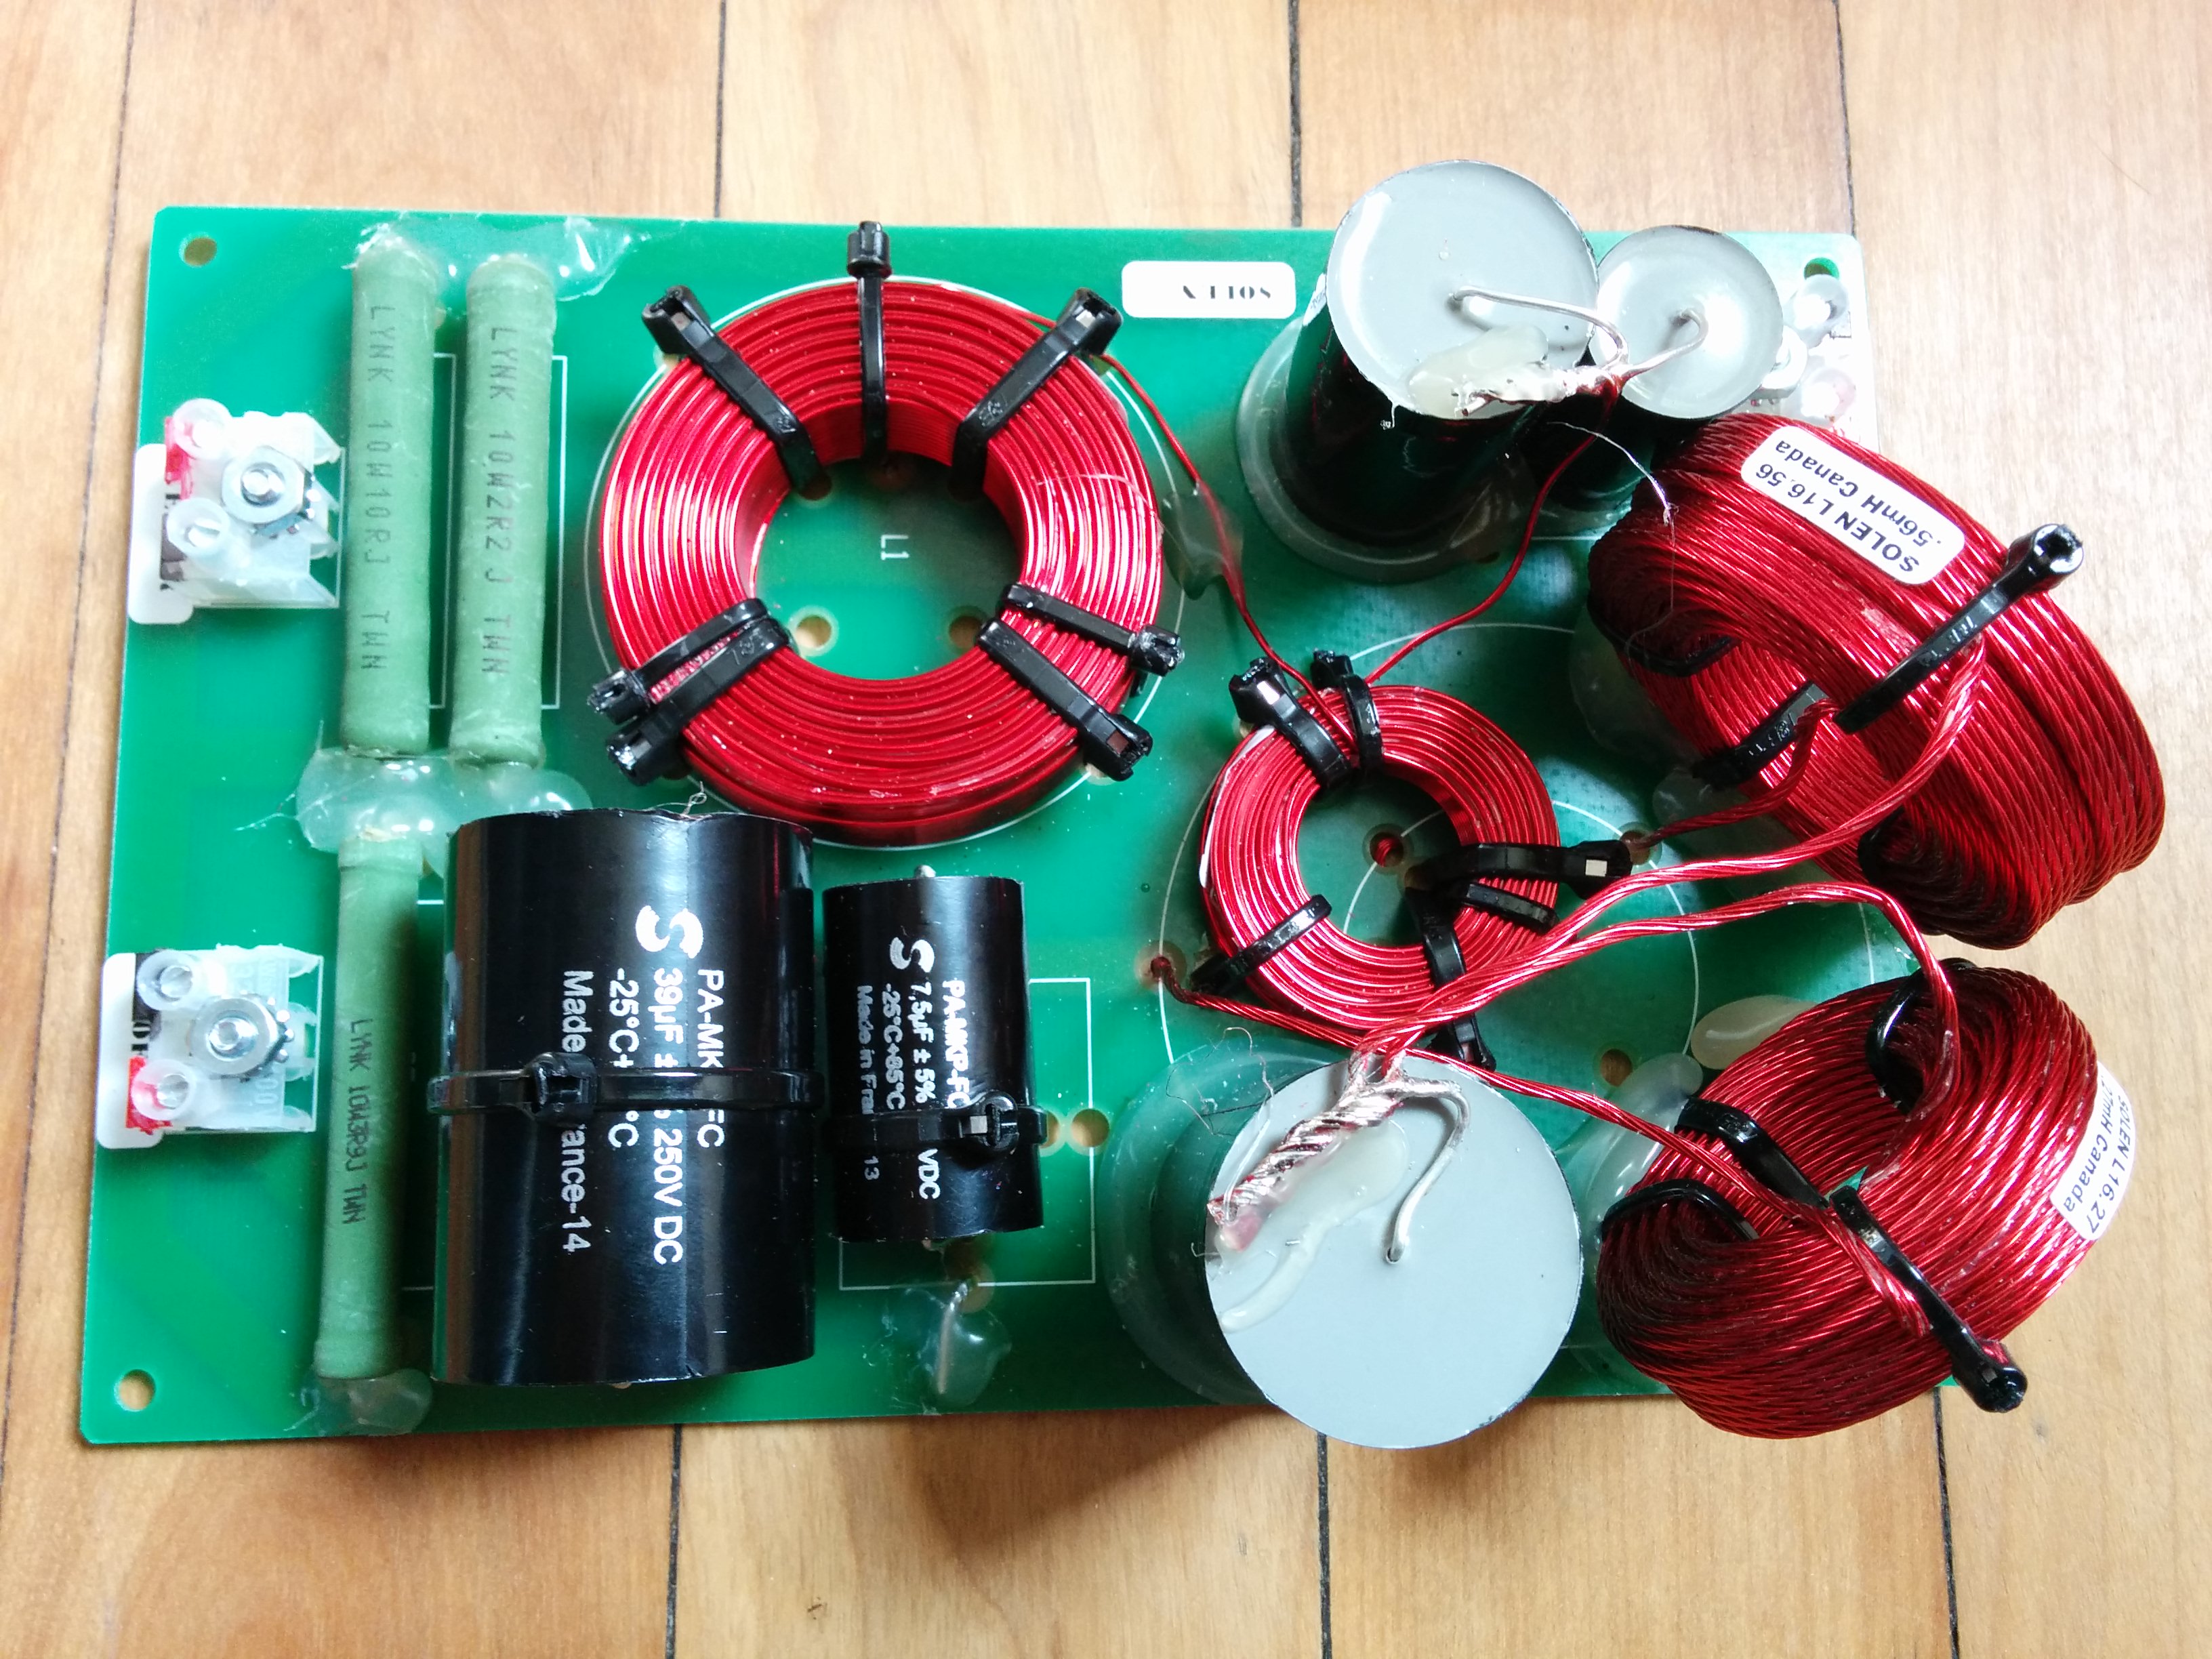
Boxport


The Crossover

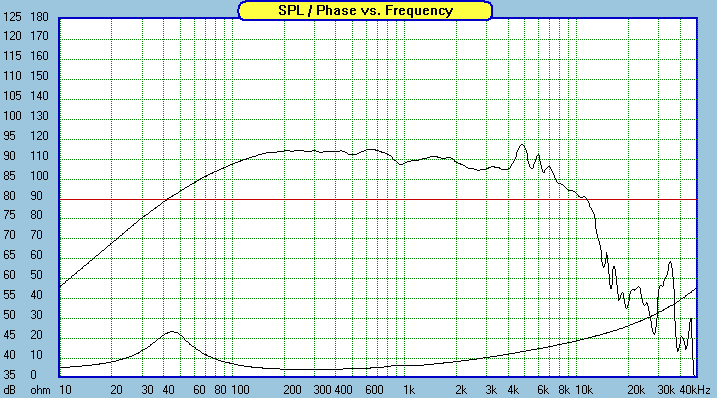
The tweeter’s optimal range of operation is from 2 kHz and up, while the woofer’s optimal range is from 1 kHz and down. Therefore the most awkward part of the spectrum will probably be between 1 and 2 kHz, which is quite common for 2 way systems. Still, I don’t think it’s going to be as much as a problem, since both drivers are still very usable in that range, so I’m making it seem worst than it really is.

Overall both drivers are excellent and aiming for a crossover frequency at 2 kHz LR4 will allow both drivers to be less audible in their weak range, and somehow, the weaknesses of one driver should be hidden out by the other one.

In that case, the 2kHz LR4 crossover have been supplied by Solen Electronique (Canada). Solen are known for supplying the best crossover components in the world and are THE reference in the HiFi industry.

I also added an adjustable L-Pad, in order to make the tweeter level adjustable. The baffle diffraction is actually hard to predict, so most of the time, the tweeter level is adjusted by trial and error by switching one resistance for another. In the case of a mastering monitor, I thought it would be more convenient to have this adjustment accessible easily, so Fred can adapt his speaker according to how his room responds.

Crossover

The final product:

12325748_10153150428726254_1263393570_o

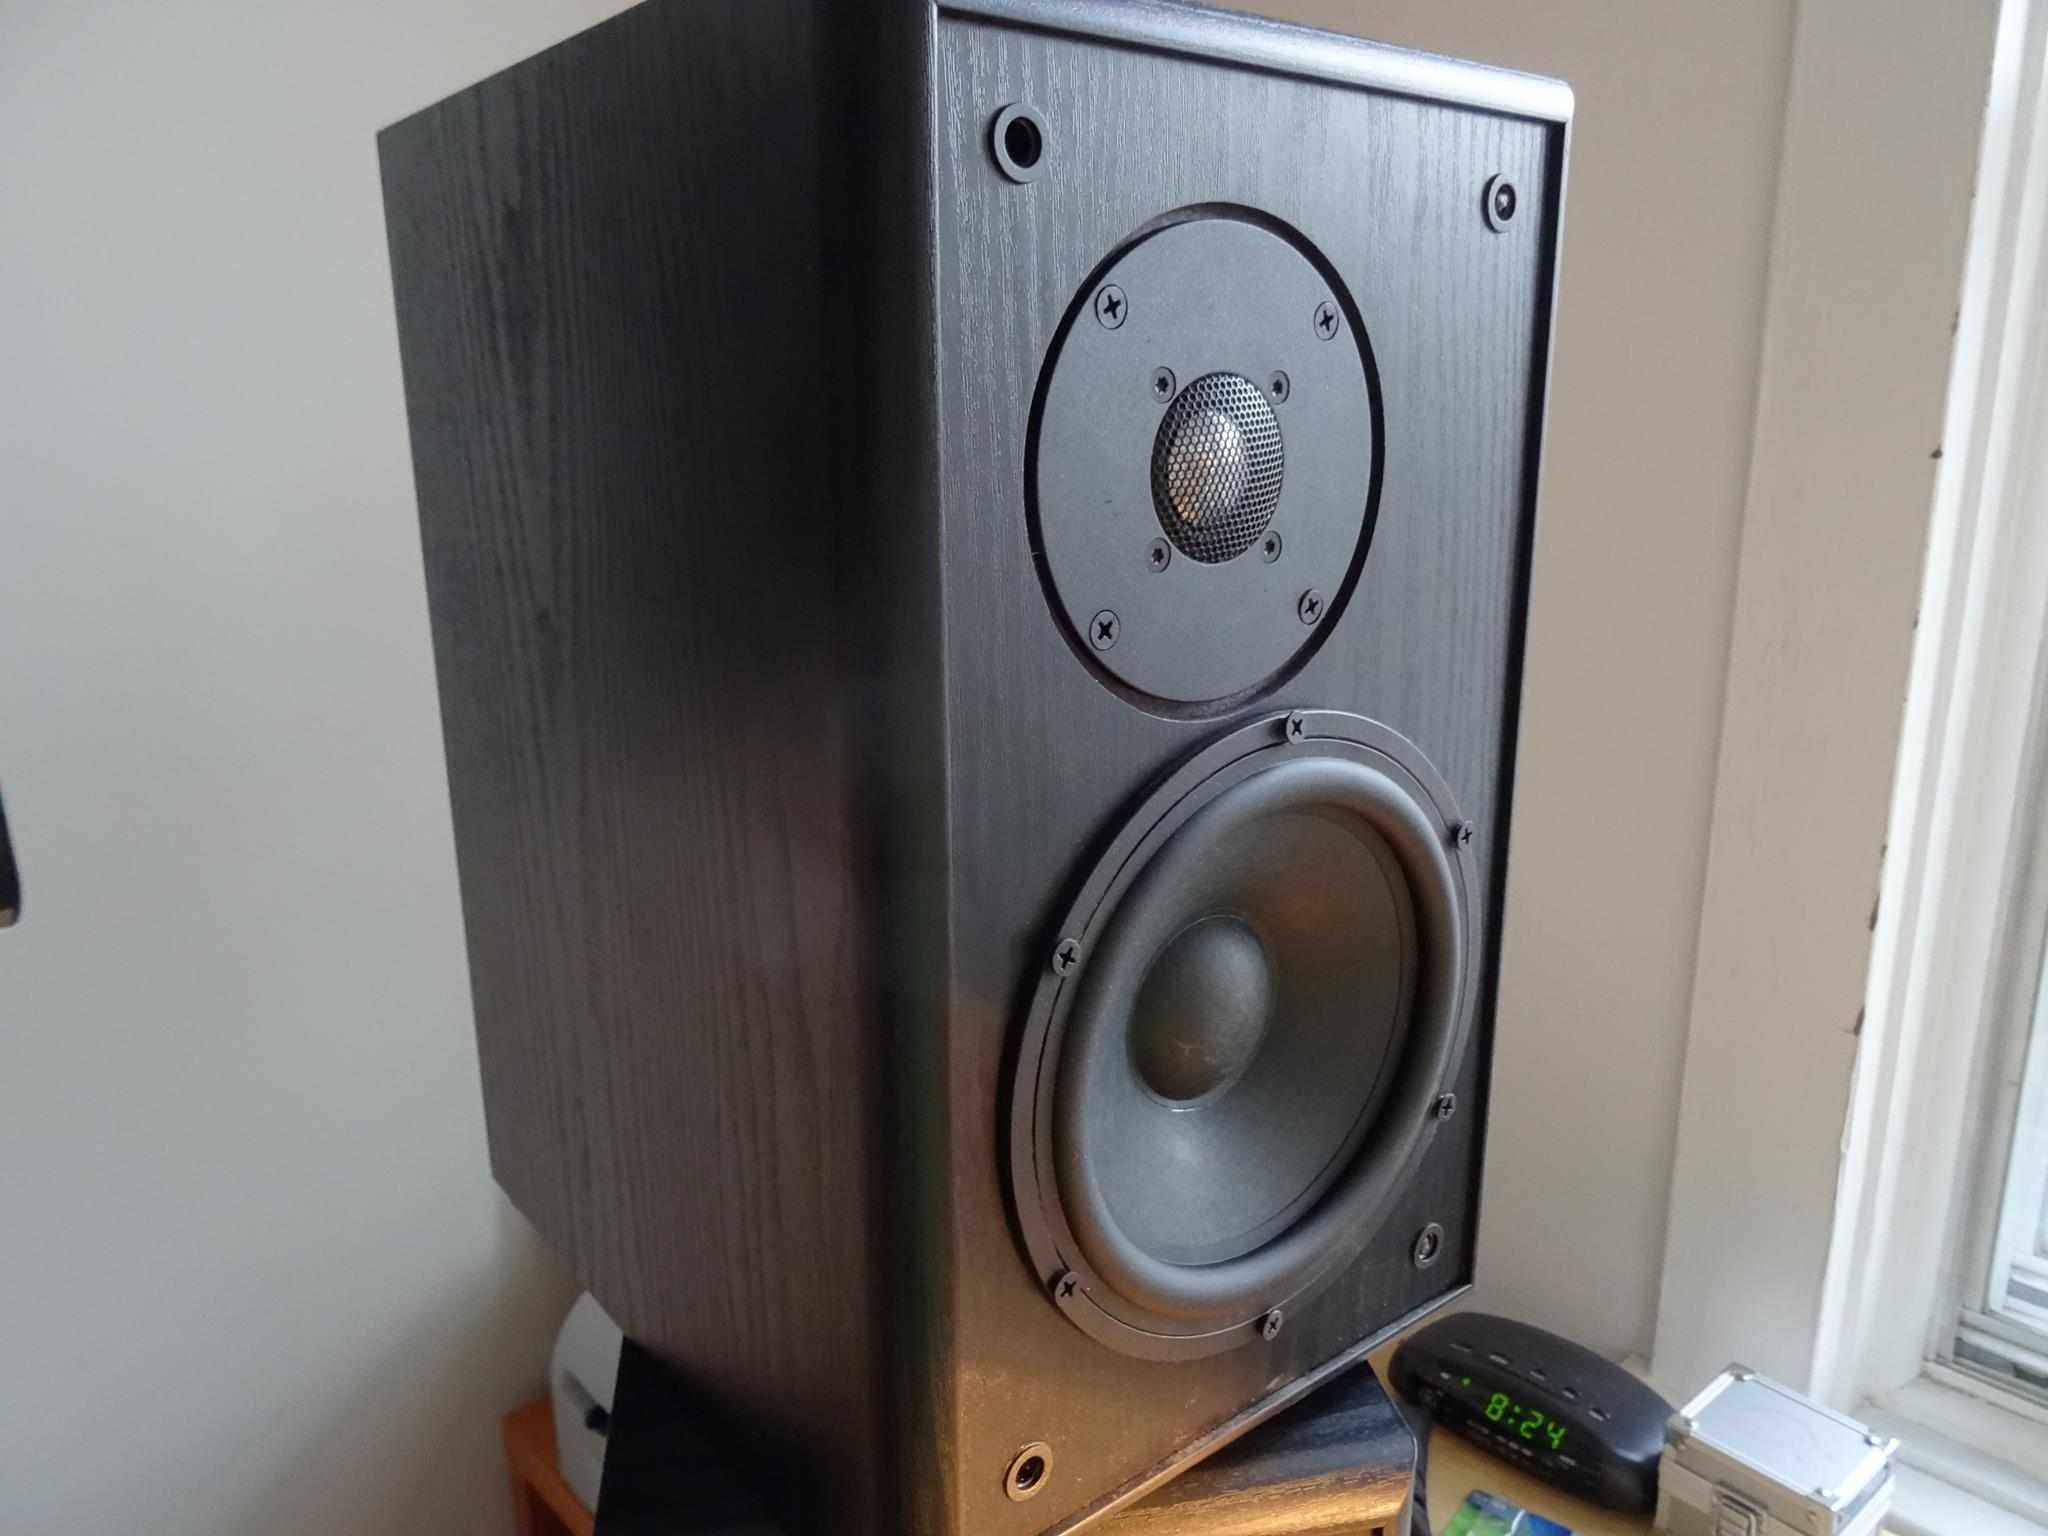
Both driver are very responsive with low distortion rates. It makes them suitable for mixing and mastering all day without ear fatigue. Both the tweeter and the woofer sound precise, quick and yet, very smooth. This box doesn’t sound as agressive as many low end “reference studio monitors”. The spectrum is full and smooth without any noticable dip. Cool fact: I thought the crossover point would be awkward and I was proven to be wrong; The two drivers seem to naturally blend into each other seemlessly.

The only drawback I can think of is that at this size, the low end extension is somewhat limited, but we already knew that before hand. The important is that the speaker does its job flawlessly on its useful range, which I consider is the case.

Fred will eventually need a high quality subwoofer to complement the spectrum, to cover from 50 Hz to as low as 25 Hz. If he is serious about becoming a mastering engineer, he will eventually have to. He will be able to rely on his monitors for the rest of the spectrum (51Hz to 21 kHz).

In conclusion, I am very proud of this design. The final product is a very coherent and precise pair of speaker for about 450 EUROS / 620 CAD / 475 USD, and that includes shipping for the components to Montreal. These small boxes deliver more than you would expect from them and I don’t think you can get anything close to it in this price range.

What to look for when choosing speakers for Audio Mastering

PMC speakers


Starting a blog is a lot of work and discipline. It obviously takes time to build a “fan base” or simply to have few followers. I have the chance to have Fred, a guy from France that always had plenty of questions for me, since our first chat about a year ago.

It’s always rewarding to have a participating audience, as this audience will naturally tell you what information is missing out there. So here again, I’ll take the time to answer Fred’s question.

Fred’s Question: 

After reading your article, I was wondering what do you suggest about speakers for mastering?

It’s a complicated question to answer, so I’m not surprised there aren’t many blog discussing that. We need to keep in mind that the monitoring must be flawless for mastering (as opposed to mixing), as its the final step prior to distribution, and therefore there is no safety net if something goes wrong.

The short answer:

Personally, I like to upgrade speakers often as my budget goes up. Here are the basic rules and guidelines I follow:

  • Don’t be frugal; that’s the most important piece in your studio.
  •  Stay away from “Studio Monitors” you find in music store, especially the affordable active 2-way. No KRKs, Yamahas, Presonus, M-Audio, etc.
  • Choose 3 way over 2 way. That’s not an absolute rule, but unless you go very high end, but there aren’t so much drivers that can cover half of the audible range without having a weak spot.
  • If you can build it yourself, do so ! You will get the best “bang for the buck”. There are plenty of very good design available online.

And Yes… that was the short answer.

The more complete answer is:

Guidelines are a good reference point to start with, but I wouldn’t personally pick my speakers only based on price and the number of drivers… I think you shouldn’t either. If you want to make a living from Mastering, you’ll have to be more critical about your monitoring and need to know what to listen for. Mastering is about as high end as an application can be for a speaker. It was therefore critical to come up with a well detailed guide:

To start with the beginning, here are the basic criteria I look for in a pair of speaker dedicated to mastering:

1. FREQUENCY RESPONSE

Frequency response is good place to start with, because it’s the easiest to understand. Also, the frequency response curve is one of the few technical chart that we can usually put our hands on. Even then, very few of the fabricant put them out there. The response curves are often generated by Audiophile magazines when they review it. This is the measured frequency response of the DIY speaker I’m currently using for mastering:

Flat Frequency Response

  • A flat frequency response – That’s the basic criterion to get in the game. Most HiFi speakers are far from being flat; Most of them will have incredible dip and peaks and that’s not workable for mastering. Eventually you will end up knowing your speakers, but if everything you do feels counter intuitive (e.i. It feels better with more 2kHz, but you know your speaker has a dip there, so you keep it low…), you will never able to get creative at mastering. Fortunately, that criterion is the easiest one to satisfy. If you decide to design it yourself, there plenty of flat drivers on the market and response curves are available everywhere.

venting options

  • An extended low end response – Okay, you’re speaker is flat, but how low does it get ? The term “F3″ is used to define the lowest frequency that is within 3dB from the baseline of the frequency response. There are three basic families of enclosures: Sealed, ported and transmission line. Sealed will have a tight response but little to no bass extension. Ported (or vented) will have a decent bass extension, but it will slow down the transient response. If the port is tuned too low, the transient response will be too smooth to be accurate. If it’s tune too high, it will not be able to reproduce lows, but it might also sound boomy as the bass extension will create a peak instead of a smooth extension. The best of all is clearly transmission line. The transmission line design allows the woofer to go as low as it can while retaining a very precise transient response and improving the efficiency. The harmonic distortion is also kept at its minimum using this design. Unfortunately, transmission line speakers are not popular on the market as a) they cost more money to build b) they require larger cabinets. An example of commercial speakers that uses the transmission line principle will be the PMC. The following picture shows how a transmission line design look like in the inside:

transmission line


extended high frequency response

An extended high end response – Indeed a spectrum has two opposite ends. The low end of obvious to most people, but the high end of the spectrum is also important. There is way more information above 16 kHz that people think. If there is a sound that is aggressive there, you want to be able to hear it and cut it out. That’s also where all the harmonics from all the distortion get up to, sometimes you need to add some sparkle, sometimes you want to clean it out. Please note that on most affordable “Studio Monitor”, you can’t hear anything above 16 kHz. On my speakers I can actually hear in the 21 kHz range. That indeed suppose your ears still can hear well these frequencies at all. Most people to hear much above 18 kHz, and with age this number constantly goes down.


Okay, but that’s just the basic!

Having a flat and extended response is basic criterion to get into the game, but it’s not merely sufficient to make world class masters!


3. TRANSIENT RESPONSE

The mastering process is a lot about shaping dynamics, through compression, limiting and enveloping. That’s what makes all the difference between a world class and a demo mastering. To come back to the KRK RP-10-3 example, I had a relatively flat frequency response throughout the spectrum, so I was able to produce masters that sounded well balanced everywhere. BUT, the impact of the transient, the details, the musicality of my masters were suffering when listened to elsewhere, mainly because the transient response of my speakers wasn’t accurate. . In other way, what I was hearing wasn’t the truth.

CSD

The waterfall plot you see above comes from the measurement of the RS-100, a 4 inch woofer. You could generate the same plot if you were to measure your speaker response as well. These plots are usually hard to find otherwise, although they tell a lot about a speaker. (That’s actually why the fabricant doesn’t publish it!!)

The perfect theoretical speaker would have only slim layer at 0.0 ms and then absolutely no ripples afterwards. Beside plasma speakers (which are expensive and dangerous – Ozone generation + high voltage), no technology is actually able to reproduce something near that. That said, tweeters can get very close to it. Here is an example of a tweeter that stops on a dime, Hiquphon OW4:

hiquphon

This tweeter is very popular among DIY audiophiles as it creates an amazing sense of realism. At that point, you don’t hear the tweeter anymore, but you hear the original sound. You can actually listen to a piano recording, close your eyes and actually BELIEVE the piano is in the same room as you. Most of us will never experience this with any speakers, but these are pretty rare and incredibly expensive.

Woofers aren’t even close to have such responses. Generally speaking, the bigger the woofer is, the slower it is to respond and longer will be the ripple effect after. The reason is quite simple, heavier the membrane is, the harder it is to control it. That comes back to why I recommend 3 ways over 2 ways…

The first reason is that you will need a large woofer to get the low end we discussed about. Unless you have a tweeter that gets incredibly low, your woofer will have to take care of most of the mid. If the woofer is large (8 or 10 inches for example), it will have a hard time reproducing the mid and high mid accurately. The second reason will be discussed in the next session (Harmonic Distortion).

In a 3-way configuration, you will have the option to place either a smaller woofer (that can move more quickly) or even better a 3″ dome midrange. The 3″ dome midranges tend to be incredibly clean on the distortion and they respond on a dime, such as a tweeter. Not surprisingly, they tend to be much more expensive as well. Still a small woofer will do a very good job. Plus, the transition from the tweeter to the midrange to the lower woofer will sound more transparent as their transient response will gradually degrade from the top to the bottom, instead of a very obvious contrast.


3. HARMONIC DISTORTION

harmonic distortion


Harmonic Distortion is a good example of something that matters much more in a mastering than in a mixing context. Affordable “studio monitors”  are terrible in that area.

All drivers have harmonic distortion, but only expensive well designed and built one have low distortion profiles. Generally speaking, the distortion increases with gain and decreases with frequency. That’s why cheap mini speakers distort a lot in the bass when they are pushed to far.

What is distortion exactly ?

No driver is perfect. Instead of reproducing the exact pure sound, it will also generate what we called harmonics. For example, if you play a pure sine wave at 1 kHz, the woofer will indeed reproduce the 1 kHz, but it will also generate a more quiet 2 kHz tone, as well as an even more quiet 3 kHz one, an again quieter 4 kHz and so on. They are respectively called the 2nd, 3rd, 4th order.

Generally speaking, higher is the order, the quieter it gets, but it isn’t an absolute truth. The 3rd order distortion might be louder than the 2nd order for a certain frequency, It’s common practice to measure up to the 5 first order, but the order above that are usually too quiet compared to the 2nd and the 3rd and are therefore neglected.

The lower the distortion profiles are, the more expensive are the drivers.

Why should I worry about distortion ?

Lack of resolution

Distortion will have the effect of hiding details. In some ways, the definition or the lack of is usually caused by the distortion content of a speaker. Imagine this: Instead of having the pure sound, you have a constant noise playing in the background. That’s why some speaker will sound “cleaner” than others.

Ear Fatigue

Another very important consideration is the following: If you work all day long on your speakers, your ears will get tired very quickly. This is due to the harmonics that are adding up on top of each other and creates a fake high frequency content. That high frequency content has a lot of energy and sounds very aggressive. This can actually hurt your ears more than you would think.

Fuzzy Low End

If it wasn’t clear already, the lower you want to get in frequency, the bigger the woofer has to be. At least 8″ woofer is recommended to get a good low end. That said, it is true that some 6-1/2″ woofers can get pretty low too. The main problem with using undersized woofers is that it will introduce more harmonic distortion (more about this subject later on) in the low end. One way to bypass this problem is to work with a dual woofer system. Dual woofer implies that each of them will work less intensively to reach the same level, which with reduce their individual harmonic distortion by much.

speaker-pic2

My current setup uses two 6-1/2 to take care of the low end, and gets down to 40 Hz with a rather clean distortion profile. In that case, the quality of the woofer plays for a lot. Still, I can’t expect these to go any lower than that.


KRK Rokit RP10-3 – The $10 Upgrade That Changed Everything

IMG_20141216_121347


KRK RP-10-3 is the first pair of speaker I bought when I officially registered Quantum-Music Mastering as a company about 4-5 years ago. My father, my girlfriend and I teamed up to by this pair of speaker and it was by far the best thing we could buy with the budget we had at the time.

I was used to working on small  KRKs. I also had huge HiFi speakers before that and I had great confidence that I could achieve great masters with larger than life KRKs.

According to specs the KRK RP-10-3 were great: flat and extended frequency response, with adjustable low and top ends. Just what I needed for mastering… well I thought.

So, what’s wrong with it ?

When I plugged it in and started to work on it, I noticed many problems with that pair of speakers:

  • The bass was soft and undefined, long ringing.
  • The tweeter had no detail, and no realism at all.
  • When working all day long on it, ear fatigue was a real problem (mainly due to the tweeter).
  • The integrated amp was incredibly noisy.
  1. Soft, undefined and ringing low end

For the first one, the easy fix was to block the port with the foam. I used the kind of foam that we put on beds to make the mattress softer. People get rid of these all the time. That cost $0.

The foam isn’t 100% opaque to bass, so it wasn’t technically sealed. Still, the pressure drop caused by the foam was enough to tight up the transient response. The bass was then dryier and stopped on a dime. The drawbacks were the following:

  • I lost a bit of efficiency; I had to increase the woofer level. Since we have a knob for that at the back, it wasn’t a problem.
  • I lost a bit of low end extension. I ended up removing temporarily the foam when I needed to check something below 40 Hz. It’s wasn’t perfect, but still a viable compromise.

1 and 2. Tweeter that no detail and high distortion levels

That one was the less obvious one. I had this brand new pair of speaker and I’m like “I’m going to cut the tweeter out of it and upgrade it”. These days, I’m designing speakers all the time, but at that time I didn’t have the knowledge I have today. I first tried to call Solen (a DIY Speaker shop in the greater Montreal) and they told me they couldn’t help me. Still, I was determined to make it work so I got started by looking what was under the hood:

IMG_20141102_122904

IMG_20141128_205508IMG_20141128_205459

IMG_20141128_205743


The replacement tweeter

Dayton_ND16FA-6

Finding a good tweeter that could press fit in the 1 3/8″ was the biggest challenge. I was disappointed to see that no high end tweeter would work. Still, I’ve been able to find something quite decent, especially for the price.

Available for less than $10 on Parts-Express (http://www.parts-express.com/dayton-audio-nd16fa-6-5-8-neodymium-dome-tweeter–275-025), Dayton Audio ND16-FA is the best tweeter I found that could physically fit the 1 3/8″ hole. It’s a 5/8″ neodymium soft dome basically outperform most tweeter in that price range, including the KRK original one.

The specs

 Frequency Response

The RP-10-3 being a 3 way design, the tweeter doesn’t need to have a super extended frequency response. That’s good because flat and extended frequency responses come at a price.


Dayton_ND16FA-6-FR

Against our first impression, the frequency response is really usable. The descending slope will be compensated by the crossover slope to give a flat final response. The response is ruler flat on its audible range, which is what matter the most to me. There is clearly a breakup node at the end of the audible spectrum, which some people would call “Air”. I’m personally okay with that, as super expensive tweeter also have this shape sometimes, and it kind of compensate for the frequency response of our ear. So, it’s all good on that side.

Distorsion Profiles

Dayton_ND16FA-6-HD

Working all day on speakers, I’m very picky about distortion profiles. Having a clean non-fatiguing sound contributes greatly to the quality of the studio experience. I used to get very tired at the end of the sessions as my KRKs where literally killing my ears. Low distortion levels are often refer to “clean”, “pure”, “detailed” sound.

The ND16Fa has a pretty clean distortion profile for a tweeter in this range price. This is especially true above 4 kHz, as the second order get quite high below this point. The KRK being crossed around 3.5 kHz means the tweeter can be used without any issues.

Transient Response

The thing I hated the most about the original tweeters were how undefined were the high frequencies. I was telling myself: “Common! It’s a tweeter, it’s its job to render high frequency well!”

This is often due the fact that tweeter doesn’t respond fast enough when it should play and keeps ringing when it should stop.

Dayton_ND16FA-6-CSD

For those who are fan of colorful 3d plots, you’ve been served! This chart above shows us how tweeter will react once we play a impact noise (i.e. snare). It is like a frequency response plot, but the third dimension is time. You can see that in the range of interest (3.5 kHz to 16 kHz) the tweeter responds exactly how it should: It plays when it plays and stops on a dime when there is no signal. On that matter, the ND16Fa competes with very expensive tweeter. There are clearly some ringing around 2.5 kHz and around 21 kHz, but both of them are out of our range of interest.

What about the crossover ?

At the time, I was looking for a quick fix rather than an elegant optimized solution. In other word, I didn’t even looked at it.

I knew what was the crossover point and I measured the impedence of both tweeter. I knew the new tweeter had a slightly bigger impedance,  but it was all fixed by cranking the HF level up a bit, so no problem here. The crossover frequency might have shifted slightly, but nothing noticeable.

3.The integrated amp was incredibly noisy.

For the last point, the only way I “addressed” it was by using them in a mid-field/far field configuration.

How it looks like after:

IMG_20141216_120419

That’s it! That wasn’t complicated at all, right ? Still, I have to admit that it took some guts to cut out the tweeter from a brand new pair of speaker. That said, that was totally worth it.

How does it sound you ask ? Well, it still doesn’t sound like a $10000 pair of speaker, but there was definitely some major improvements. Not bad for $10 mod !